 |  | |||||||||||||||||||||||||||||||||
 | ||||||||||||||||||||||||||||||||||
 | ||||||||||||||||||||||||||||||||||
DESIGNING AND MAKING a nest box is enjoyable and you get exactly what you want. It can take time though! Here are some designs that'll give nicer boxes than can currently be bought in the UK | ||||||||||||||||||||||||||||||||||
A hierarchy of designs Basically there's no set or definitive design for a Tawny Owl nestbox -- there's no design you have to follow or owls won't use it. In fact, after digging around on the internet a great deal it seems that there's a dearth of good box plans both in this country and in Europe. More thought is going into nestboxes for various owls in the USA, so I've allowed myself to be influenced by designs for the similar Barred Owl there. | ||||||||||||||||||||||||||||||||||
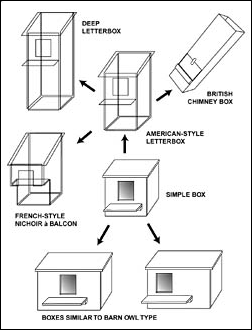 | ||||||||||||||||||||||||||||||||||
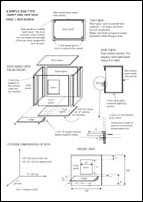
A hierarchy of boxes -- relationhips between a range of possible designs for tawny owls. (Not to scale.) | ||||||||||||||||||||||||||||||||||
Some basic principles First, then, some basic principles. 1. Floor space Give the mother and kids enough room! The mother likes to stretch out and the growing owlets need room to bounce around and exercise their wings. Use side dimensions that give a minimum internal diagonal (corner-to-corner distance) of 14 inches (36 cm) as that's the minimum length of an adult owl. It's a good idea to make the box wider than it's deep to reduce the strain on the attachment to the tree. For example a box with external sides of 15 in x 11 in will give an internal diagonal of 17 inches, which is plenty. Formula for diagonal is Square root of [ (Side 1)2 + (Side 2)2 ] , i.e. add the squares of the two sides and take the square root of the result. Easily done on a calculator with a root calculation function.
2. Drop from entrance to floor The entrance must be some way above the floor or the chicks may fall out before they're ready to deal with the world. The drop should be a minimum of 4-6 inches (10-15 cm) in shallower boxes to 8-12 inches (20-30 cm) in deeper letterbox-type boxes. A bigger drop gives more protection against predators. 3. Ledge I'd recommend a ledge as essential for the safety of the chicks in the week before they're fully fledged. This is a period when they become adventurous and make frequent appearances in the entrance to a box. A ledge provides a safety net against the risk of falling or being pushed from the entrance door. 4. Materials and construction Aim to make a sturdy box. Use wood that's a minimum of 1/2 in (12 mm) thick and reinforce internally with 1-in battens in each corner. If using plywood, make sure it's exterior grade. Don't use chipboard. Assemble with glue and screws -- don't even consider using nails! Where appropriate screw out from the box rather than in to avoid sharp points inside the box. I suggest some amount of sealing to weatherproof the box outside and for ease of cleaning inside. 5. Back panel Always have the back panel inside the side panels as it makes for a much more secure construction. This is shown in the plans. Nearly all the commercial boxes have the side panels hanging from the front of the back panel, which is a mistake. 6. Attachment to tree You may need to decide on what form of attachment you're going to use before planning your box as parts may need to be fitted before the rest of the box is fully assembled. Check with the next page: Attachment methods. | ||||||||||||||||||||||||||||||||||
The most basic design is the straightforward box shape shown on the right. It can be flat-roofed or have a sloping roof. Variants of the sloping-roofed type can have the roof sloping to one side or to the back -- both avoid rain water running from the roof on to the ledge, although this is a small advantage. A back-sloping roof could tip too much water over the back attachments. Aside from some points already mentioned, this type of box has the following advantages: | ||||||||||||||||||||||||||||||||||
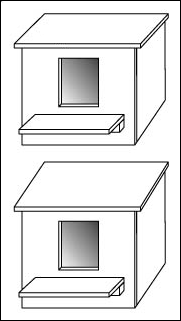 | ||||||||||||||||||||||||||||||||||
1. Simple to make. 2. Female can see out and call to her mate. 3. You'll be able to see the mother and the chicks. 4. Low entrance, so no cleaning hatch needed. The form with the sloping roof is the type I chose for our main nestbox and so far I've found it entirely satisfactory. This box should not be used in areas where there are predators that may take unguarded eggs or chicks. In such areas use the letterbox (Design 2) or nichoir à balcon (Design 3). A marten-proofed box is suggested in Design 4. | ||||||||||||||||||||||||||||||||||
 | ||||||||||||||||||||||||||||||||||
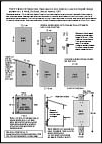
Design 1.1: Variant on the simple box A variant on the simple box design is a nestbox designed by the Barn Owl Centre, Gloucestershire. Although primarily a design for Barn Owls, they say Tawny Owls use them too. If you make a box like this remember to have a minimum 5-inch drop from the entrance to the floor—which is perhaps a little deeper than in the pic. Dimensions are given on Page 9. The box has two potential disadvantages: it's on the heavy side; and another user of similar long, low-ceilinged boxes (Kauzcam in Germany) has found that tawnies may not favour them as much as more conventional (deep) boxes. I'm also not in favour of the gang-plank type ledge shown in this example. The ledge should always run along the box. | ||||||||||||||||||||||||||||||||||
 | ||||||||||||||||||||||||||||||||||
Important note (June 2008) The Barn Owl Trust, Devon, has recently decided to stop using boxes of what they call the "all on one level" type for Barn Owls as their experience shows that a low-profile box can be insufficient to keep chicks safely inside. My own experience with Tawny Owl chicks is that they are better behaved, and a low barrier under the door is enough to stop them having accidents—basically, by backing out of the box when they do poos. Tawny Owl nestlings do not make active attempts to leave a nestbox before about 25 days of age, i.e. when they are approaching fledging. However, my experience is far more limited than the Barn Owl Trust's, and if you want to take no risks you'll be better off choosing a medium-depth letterbox design (see below). In any case, in a simple box for tawny use never make the drop below the door less than 5". And if you believe the BOT's advice (no reason not too), think carefully about using a low-profile box for Barn Owls. More on the Barn Owl Trust's position on low-profile boxes on the previous page, where there's a link to the relevant page on their website. | ||||||||||||||||||||||||||||||||||
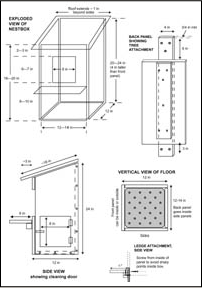 | ||||||||||||||||||||||||||||||||||
Design 2: Medium depth letterbox This is a good design for a Tawny Owl nestbox. If made with sides of 12 in x 14 in, the internal diagonal is a generous 17 inches. With 12 in sides the diagonal is 15 inches. The plans are for a 12 in x 14 in x 24 in box (20 in high at the front). This set of plans doesn't show corner battens, but I'd strongly recommend using them as they add considerably to the robustness of the box without adding much to the weight.. A minimum of 12 mm exterior ply should be used with glue and screw assembly. The plans show a recommended way of setting about doing the bits for the attachment to the tree -- i.e. using an internal piece of wood so longer screws can be used to attach the back bar. This is a fixture on which economies should not be made -- the box mustn't be able to rip away from the back bar! For other attachment methods see Page 5. The disadvantage of this box compared to the simple box above is that one can't see what's going on inside, but it gives more protection against predators. The chicks will be seen on the ledge in their last week before flying, 7 1/2 weeks after laying. | ||||||||||||||||||||||||||||||||||
Design 2: A (highly) recommended example -- the "Dutch" letterbox Just recently (August 2007) I came across this nice example of what's essentially a US-style letterbox but built for Tawny Owls. It was made by Arnold van den Burg, who maintains a dozen or so in the woods near Ede, not far from Arnhem in The Netherlands. The design is from a Dutch monograph on tawnies (J.H. Mooij, De Bosuil. Utrecht: Kosmos, 1983). The size and proportions are almost perfect. They are: height 55 cm at the back, 45 cm at the front. The sides are 35 x 35 cm. The entrance is 15 cm in diameter. The sides give an internal diagonal of about 18 inches (45 cm) -- very roomy. Construction looks pretty simple. (Approx dimensions in inches: Height 22 (back), 18 (front); sides 14; entrance 6) So, if you want to run up your own plans I'd recommend basing them on this. Note that there's no ledge or drainage holes (I'd add them), and I'd suggest using something steadier than the single square-section batten for attachment that's shown in the pic. This could be either a single plank or a double batten arrangement. It also appears that the roof is hinged, so no need for a cleaning hatch in the side. This box is so good that I'll run up some plans for it some time. Photo © A. van den Burg.
Plans now ready . . . Here's a page of plans.. The plans include a ledge for the chicks' safety. Clicking on the thumbnail downloads a pdf file called "Dutch letterbox". Check through the general box-making instructions further down this page before starting. (Step-by-step construction guide with pics on this page. As stated there and below I now think the plans make an overlarge box and I'd recommend taking 6 cm off the front to back measurement given in the pdf). The box can be made from timber or external-grade plywood. Don't neglect to put in the corner battens shown in the plans as they add significantly to the sturdiness of the box. If using timber the ones along the top edges are essential to hold the box together. | ||||||||||||||||||||||||||||||||||
 | ||||||||||||||||||||||||||||||||||
 | ||||||||||||||||||||||||||||||||||
The letterboxes -- which one? The two boxes are actually very similar and illustrate the point that you can make a nestbox pretty much as you like. The Dutch box is roomier and not as tall. The hinged roof is probably a little simpler to do than the cleaning hatch in the side of the first box. On the other hand a side hatch makes cleaning in the tree easier. The 14-in outhang (front to back measurement) of the Dutch box means it pulls a bit more on the top of the back attachment -- i.e. the outward rotational force on the fixing screws is greater. January 2008: I'm making two of the "Dutch" letterboxes for use this year. As I've found the plans as given above to be a little too roomy (!) I'm making the second box 6 cm less deep from front to back. This still gives an internal diagonal of just over 16", which is plenty. Also a simple idea for a sliding cleaning hatch -- metal hinges and latches can be a problem outdoors. I'm using my double batten back attachment as it has been so successful on our main box. Illustrated report of progress just started on this page. | ||||||||||||||||||||||||||||||||||
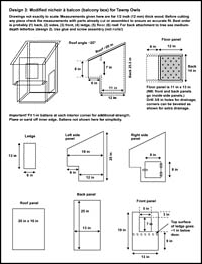 | ||||||||||||||||||||||||||||||||||
Design 3: Modified boîte avec balcon or nichoir à balcon This is the french variant on the letterbox (nichoir means nestbox). In its standard form the front panel of the balcony is right at the front -- i.e. the balcony is completely enclosed. This has the advantage of increasing protection against predators as an intruder can't see or get at eggs/chicks until it's some way into the box. But as this design reduces the utility of the ledge to the owlets, the design suggested here is a modification that opens up the balcony, or ledge, to the outside. There's a nice french page here that illustrates the safety features of the nichoir à balcon with some amusing cartoons. It ends by telling you that if after looking through it you haven't plumped for a box of this type you must be très paresseux . . very lazy! The design has been made fairly compact, giving a box with exterior dimensions of 12 in front to back (18 in including the balcony), 14 in wide and about 25 in high at the back. With 12-mm wood this gives an internal diagonal of 17 in. The disadvantage of this type of box is that it carries extra weight at the front due to the balcony extension, making a secure tree fixing even more of a necessity. And because of its bulkiness it may also be more difficult to put up except in easily accessible positions. | ||||||||||||||||||||||||||||||||||
Design 4 : Marten-resistant nichoir à balcon Here Deisgn 3 is modified to produce a steeply sloping roof which, when covered with a slippery plastic or polystyrene sheet, is supposed to make it difficult for a marten (or cat or squirrel) to reach the entrance to the nestbox. Further protection is provided by adding plastic panels to the sides. The downside of the design is that to get the steep roof the box becomes rather tall at the back -- here 33 inches or nearly 3 feet. Width and depth dimensions and the internal diagonal are the same as Design 3. Please note that this design is not proven to be predator-proof! I've not made one, but it's based to some extent on the marten-proofed Barred Owl nestbox used by OwlCam in eastern Massachusetts. | 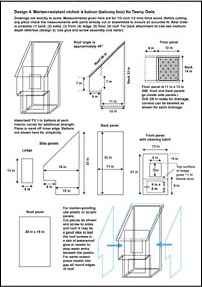 | |||||||||||||||||||||||||||||||||
An example of the simple box design Darkec in Croatia has used the wood from a couple of pallets (the wooden stands that go under packing crates) to make an interesting version of the simple box. Particularly interesting about the construction is that he has made the sides from pieces placed diagonally (shown in pic), giving the box a great deal of strength against deformation. Full details, illustrated with lots of pics, are given in this thread on Ptice.net (a good Croatian birding site; ptice means birds). The text is in Croatian but the pics -- some very amusing -- are self-explanatory. For more on Darkec's owls, see A tawny brood from Croatia (2006) on this website. | ||||||||||||||||||||||||||||||||||
 | ||||||||||||||||||||||||||||||||||
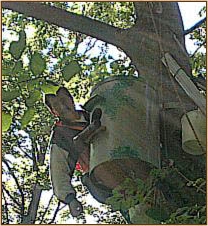 | ||||||||||||||||||||||||||||||||||
A barrel design from Kauzcam in Germany This is a very interesting design and I'm grateful to Thomas Blodau for providing details. They tried other designs, including the tube type (both upright and on its side), but the one Thomas says the owls really like is the barrel type shown in the photo. They're a lot of work to make, he says, but the owls seem to love them and move in almost immediately. By contrast they didn't think too well of the tube type (chimney or letterbox), whichever way it was placed. Thomas' description of the box follows below. One noticeable feature is the roominess. One supposes too that what attracts the owls is the "organic" round shape of the box. There are some rather hi-tech features, like the method of attaching the barrel to the tree, but alternatives should be fairly easy to think up. One day I'll get round to making one myself and will put up plans. I'd certainly like to see if our owls prefer them to other types! | ||||||||||||||||||||||||||||||||||
The maker's description "The barrel is made out of 2.5 cm timber slats held together with 4 stainless-steel rings (approx 5 cm high) on the inside and outside of the barrel. The 2 cm thick wooden floor is screwed in at the bottom, giving the barrel additional support. The box is treated inside and outside with dark linseed oil before the top cover is put on. The top cover, a 1.5 mm stainless-steel or hard plastic plate, is glued onto the outside rings of the barrel with teroson and secured with a number of stainless-steel screws. "The outside rings ensure that the steel or plastic covers do not directly touch the wooden barrel and prevent condensation. Through the little gaps in the barrel air circulation is also ensured. This very durable outside cover makes the box storm- and rainproof and it should last a very long time. Predators will slip on the smooth surface before getting near the entry hole. "Painted in a light grey colour with a few green patches, the box blends into the surrounding woodland and does not heat up in the sunlight. A stainless-steel lid is used as a removable rooftop and is insulated on the inside with 5 mm rubber. "The ledge is made from oak with a 5 cm diameter branch added at the front. It is approximately 10 cm below the entry hole. "The inside box measurements are 40-50 cm in diameter and 60 cm in height. The distance from the floor to the entry hole is about 20-30 cm. We place a 5 cm layer of wooden chips in the box. "The box is attached to the tree with two stainless-steel bands that are welded on the back of the box (if steel is used for the top cover) and go round the tree trunk. On each side the bands are secured [to the tree trunk (Ed.)] with aluminium nails and/or stainless-steel screws. "We also use a 12 mm stainless-steel bail for attachment (on plastic covers). No rocking is noticeable even in stormy weather!" [I'm not sure what a "bail" is -- maybe a ball? Ed.] | ||||||||||||||||||||||||||||||||||
powered by owls | ||||||||||||||||||||||||||||||||||
Nestboxes
for
Tawny
Owls
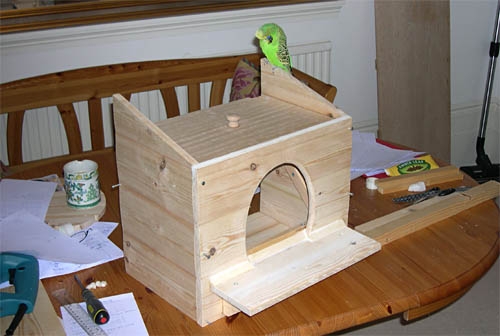
My main nestbox under construction in 2004. It's a bit complicated and took a month to make. Some of the designs on this page shouldn't take as long, though others may.
The diagram on the right is a flow sort of chart showing relationships between the main designs, inluding British, French and US types. All are obtained by stretching the simple box in various ways.
An interesting feature when people with experience of owls actually sit down and think about what an owl might like, rather than basing their design on some preconceived notion, is that they often come up with roomier boxes and, in the case of the Barred Owl, reduce the drop from the entrance to the floor. As this is in line with my own experience of what tawnies like, I'm going to follow this tendency in the designs I suggest. So, the guiding principle is less depth and more room.
A recommended design
Currently my preferred design is a version of the US-style letterbox Design 2 (below). It's an excellent, uncomplicated design, so have a look at it before ploughing through the rest.
The designs on this page are not intended to be followed in every exact detail. It's better to take ownership (as they say) of your own design so that you get involved in it and know what's going on. That way (hopefully!) you'll avoid nasty surprises during construction. Take a look at the designs, be aware of the basic principles and dimensions, and then draw up your own plans. More ideas can be found on Page 10: Boxes others are using.
Making your own:
a choice of designs