 |  | |||||||||||
 | ||||||||||||
 | ||||||||||||
DESIGNING AND MAKING a nestbox is enjoyable and you get exactly what you want. It can take time though! Here are some designs that'll give nicer boxes than can currently be bought in the UK | ||||||||||||
What you'll need - tools and materials TOOLS A fairly basic set will do, depending on how ambitious you are. The essentials are: 1. A good sharp saw. 2. Fret saw or jig saw (see below). 2. Screwdrivers (cross-head but also conventional). 3. Power drill and set of bits. 4. Set square, tape measure, pencil. Recommended extras: 4. A good set of clamps -- one of the type that fixes to a table or bench and several small "portable" type; latter are invaluable for holding pieces of wood in place while glue sets. 5. Small wood plane for beveling. 6. Jig saw (for door). If you don't have this useful tool, saw the door panel in half and cut the door with a fret saw.
MATERIALS 1. Plywood or timber (pine wood). Plywood must be exterior grade (weather/rot-proofed); 12 mm (1/2 in) is probably ideal, especially if internal corner battens are used. 9 mm plywood is only really suitable for small boxes, while 18 mm gives sturdy but heavy boxes. 2. Planed wood pieces for internal battens and (where present) ledge support. 3. Exterior (waterproof) glue. 4. Wood screws (range of lengths between 3/4" and 2" for box; tree attachment needs min 2.5" screws or long nails). All screws should be galvanised. 5. Medium-grade emery (or sand) paper. 6. Sanding disk accessory for power drill. 7. Wood stain (optional). 8. Roofing felt (optional but a good idea). 9. Yacht varnish (plus paint brush and white spirit thinner/cleaner).
Before starting Don't underestimate the benefits of thinking it all through beforehand! Think every step through carefully. E.g. the best order to measure, cut and assemble the different pieces in. For example, once the sides and floor are assembled it's more difficult to work on items like the ledge and tree attachment or apply sealants to the interior. It's worth having some idea where the box is going to go as this has a bearing on the type of tree attachment that will be used. Also, very obvious, but is there a clear space to work where all the pieces can be left undisturbed for as long as the box takes to make? Whatever time you estimate for the job can be multiplied up by at least two and a half!
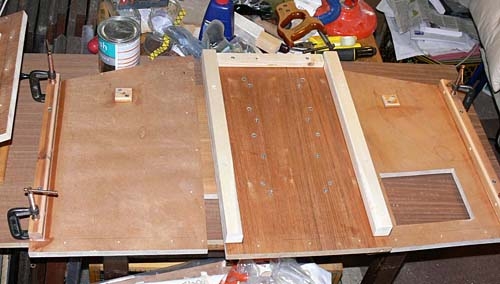
General points about the job itself I haven't given step-by-step instructions as I'm assuming that anyone chhosing to make a box has some carpentry skills and doesn't need guidance on how to tackle construction. However, I do strongly recommend that a glue-and screw construction method is used as it'll give a far more robust box than if only pins or nails are used. A good waterproof glue will increase the strength of the box. In larger or heavier boxes internal battens should be used. These should be about 1 in square and go in the four corners of the box. For simplicity they're not shown in all plans. They're especially recommended if lighter-weight plywood (9-12 mm) is used. Be careful not to have sharp screw points emerging inside the box. For external fitments like the ledge and tree-fixing bars or battens, screw from the inside of the box out. Make sure to follow the suggestions for how the box panels are fitted together -- i.e. whether they go inside or outside other panels. This is particularly important in the case of the two side panels as the weight of the box pulls out from their attachment to the back. It isn't so important that the floor panel goes inside the four abutting panels as that's just to protect the sides of the floor panel from the weather. A good sealant finish will provide the necessary protection.
Applying a finish Finishes should be applied before screwing down the roof so that you can work inside the box. Don't apply the varnish sealant to the panels before assembling the walls and floor as you don't want to seal parts of the wood that need gluing I strongly suggest sealing inside and out with thinned (add 20-25% white spirit) yacht varnish. This penetrates well, and one coat (even two) will not sit on the surface. You might also want to stain the exterior. Here are my suggestions. 1. Seal inside and out (roof, walls and floor) with a coat of thinned yacht varnish. 2. When this has dried, apply any wood stain to the outside only. Do this after applying the first coat of thinned yacht varnish as wood stain sits on the surface and is impenetrable by the varnish. It can also flake after a time or if knocked, removing any weather/rain protection if it's the base coat. 3. When the yacht varnish has dried, sand down the inside walls and floor of the nestbox to remove splinters and roughness, particularly with plywood. Then apply up to two more coats of varnish to the floor.This will stop the wood absorbing the very liquid owl chick poo. By this time the floor should have its drainage holes, and the walls of these holes need to have varnish liberally applied for the same reason. Plywood is very absorbent! 4. When finished with sealing, leave the box in a warm place for some time (a week at least) to allow the solvents to evaporate. Don't put up a box that reeks of white spirit. | ||||||||||||
powered by owls | ||||||||||||
Nestboxes
for
Tawny
Owls
A dutch-style letterbox during construction.
Making your own