 |  | |||||||||||||||||||||||||||||||||||||||||||||||||||||||||||||||||||||
 | ||||||||||||||||||||||||||||||||||||||||||||||||||||||||||||||||||||||
 | ||||||||||||||||||||||||||||||||||||||||||||||||||||||||||||||||||||||
MAKING A DUTCH-STYLE LETTERBOX In early 2008 I ran up a couple of these for our owls and did this page of pics and comments as construction progressed. | ||||||||||||||||||||||||||||||||||||||||||||||||||||||||||||||||||||||
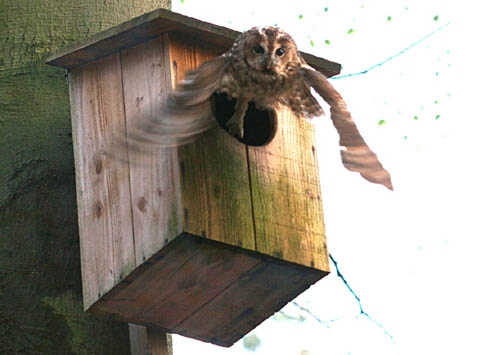
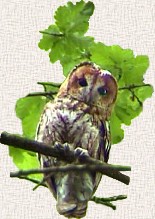
One of Arnold van den Burg's boxes. Seeing his photo on the World Owl Conference 2007 website (accommodation section!) first drew my attention to this excellent design | ||||||||||||||||||||||||||||||||||||||||||||||||||||||||||||||||||||||
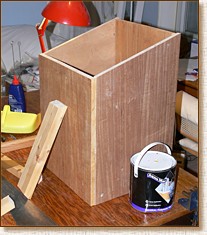 | ||||||||||||||||||||||||||||||||||||||||||||||||||||||||||||||||||||||
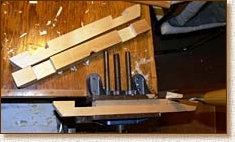
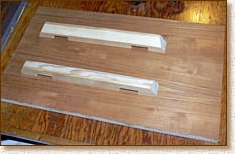
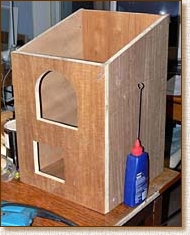
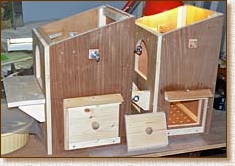
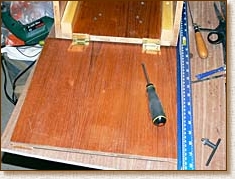
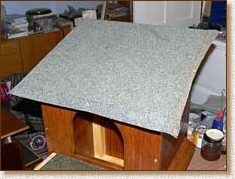
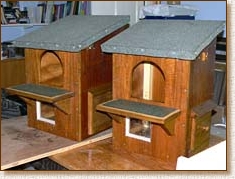
January 2008, and at last I'm under way on two new nest boxes! One is for a local pair who don't yet have one and who seem have been using a crow's nest to breed. The other is for Sophie (the current orphan) when she goes out later this year. They are going to be simple, functional boxes with no cameras and limited opportunities for owl observation. Making them will allow me to check that this box is as good as it looks, do a bit of experimentation, and make sure that the plans I've put up really work! All 12 panels for the two boxes have now been cut and I've slung those for one box made to the original plan specs together for a photo (right). Doing this earlier made me realise immediately that the box is unnecessarily large, so for the second box I've lopped 6 cm off the front to back measurement. This gives a still roomy 16-inch diagonal across the floor, which is plenty and at the same time reduces the weight hanging out from the tree. There's no need for more space as the mother leaves the box when the chicks are about 10 days old -- they'll have a ballroom to play in with the larger specs! | ||||||||||||||||||||||||||||||||||||||||||||||||||||||||||||||||||||||
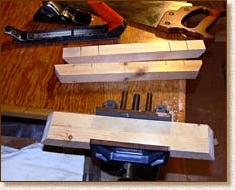
The two shaped battens propping up the front of the box are the back attachment fixtures. This is a slightly complicated way of fixing a box to a tree, but it's worked so well with our first nestbox that I've decided to use it again. We really have to use it as we've agreed with the woodland manager to use non-damaging fixtures. The entrances to the boxes are going to be square-bottomed rather than round as the latter is not ideal when two young owlets try to squeeze into the door at the same time, as they always do! To make it easy to check if the box is in occupation there's going to be a small transparent panel in the front. The cleaning hatches on the right sides of the boxes are going to be a sliding design that doesn't need hinges and latches. Finally, of course, unlike the main photo at top, there's definitely going to be a ledge, essential for the safety of the young chicks in the few days when they emerge from the box but are unable to fly.
Fiddly bits: 1. Back attachment battens The panels can now be left as the box can't be assembled until a lot of other things have been done. I'm going to do the most difficult task first -- shaping the battens that'll fit against the tree trunk. A long fiddly job. | ||||||||||||||||||||||||||||||||||||||||||||||||||||||||||||||||||||||
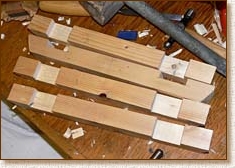
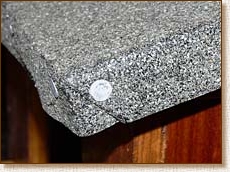
At 35 cm, the battens are going to be quite a lot shorter than the back of the boxes. This is about the same length as on our main nestbox and should be quite sufficient as the attachment they provide is so strong. Pic 1: I've sawn off angled bits at the ends. Mainly aesthetic, though it helps water runoff in wet weather. Angle is about 30°. Next mark off and saw the sides of the rebates (recesses) that'll take the cord tying the box to the tree. I'm working on pairs held in the clamp as it helps sawing accuracy and makes the pairs the same. Rebates are a half inch deep, are 1 3/4 in long and start about 1 3/4 inches from the ends. The battens are 1.25 in (3 cm) square in section.
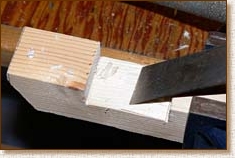
Pic 2: Knock out the wood in the rebates with a sharp chisel. Work from the surface towards the base of the recess in stages (see chisel stuck in wood at right, taking off a first layer). Don't try to complete the rebate from the side you start on or you may break wood out on the opposite side -- turn the piece over and work from the other side. Ridges in the middle are best removed in the next stage (Pic 3).
Pic 3: Cleaning out and smoothing the base of the rebate. One can finish off with sandpaper wrapped round a block later. These recesses take a couple of winds of the attaching cord when it's wrapped around the tree trunk.
Pic 4: Repeat until all rebates are done. So far I haven't had trouble apart from one knot. Unchiselable, and had to be sawn off with a hacksaw. I'll glue it into place later.
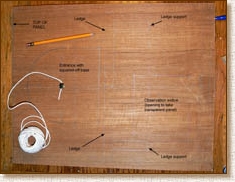
Pic 5: The tricky bit: getting the camber angle on the backs of the battens so they'll nestle snugly against the tree trunk. On both boxes I'm fitting for a 12-inch trunk. I have to find an optimum angle for the camber combined with the gap I need between box and tree so the roof can be opened easily. What I do is draw part of a 6-inch radius circle -- easily done as shown in the pic. The drawing pin is stuck in the board; then simply measure off 6 inches along the string and hold that point against the pencil as you draw a nice smooth curve! No need to tie round the pencil -- just grip the string against the pencil about half an inch above the paper and draw with the pencil reasonably vertical. Accuracy and perfection aren't necessary! I then drew a scale (in inches) along a tangent to the circle. Two pieces of paper cut 1.25 in square represent sections through the two battens. The best positions and camber are found by trial and error. The camber shouldn't go too deep, and I want to keep a gap of 3/4 inch between the box and the tree. Sounds tricky, but it's actually dead simple and it works (the large version of Pic 5 is clearly annotated). I marked out the camber on the battens by measuring from the marks on the paper. The camber is then planed off. If there are knots planing may be difficult and you'll just have to sand to shape with a sanding disk.
Pic 6: The finished battens in the approximate positions they'll be on the back panel of one of the nestboxes. (If you're absolutely baffled about what these are and how they work, see the Double back batten section on the next page, where there are illustrative pics. I'm not going to use the bolts through the middle of each batten shown there as they're not needed. Just me being ultra cautious with that box!) | ||||||||||||||||||||||||||||||||||||||||||||||||||||||||||||||||||||||
 | ||||||||||||||||||||||||||||||||||||||||||||||||||||||||||||||||||||||
 | ||||||||||||||||||||||||||||||||||||||||||||||||||||||||||||||||||||||
 | ||||||||||||||||||||||||||||||||||||||||||||||||||||||||||||||||||||||
 | ||||||||||||||||||||||||||||||||||||||||||||||||||||||||||||||||||||||
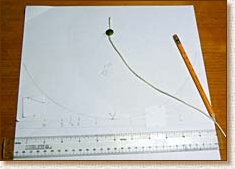 | ||||||||||||||||||||||||||||||||||||||||||||||||||||||||||||||||||||||
Simple graphical way of getting the camber for the back battens. The large version is annotated with instructions. | ||||||||||||||||||||||||||||||||||||||||||||||||||||||||||||||||||||||
 | ||||||||||||||||||||||||||||||||||||||||||||||||||||||||||||||||||||||
Fiddly bits: 2. Front panel, with door, ledge and observation window | ||||||||||||||||||||||||||||||||||||||||||||||||||||||||||||||||||||||
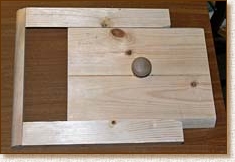
Pic 1: I've marked up the front panels carefully as having a window to check if the box is in use means the door and ledge have to be moved up a bit to make room. The window's to one side and not too large as that'll allow the female to look out and at the same time give her a sense of privacy, which a "french window" all across the front might not. I'm using vertical supports for the ledge as they're lighter than a block. And as well as having a square base the door's going to be slightly wider than the dutch design to give enough width for those two chicks that'll inevitably try to squeeze into it.
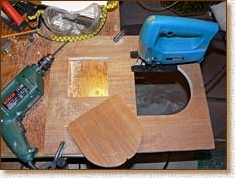
Pic 2: A jig saw is really essential for making openings in boards -- only a large fretsaw would manage on this size of board. The alternative is to cut the front panel in half and then fretsaw, but not much fun and the panel has to be reinforced later. The jig saw can slide offline like a car on a skidpan -- concentration and patience are needed to keep to the line, especially on curves. One starts of course by drilling holes at convenient points to insert the saw blade. I love this tool! I'll come back to the front panel later . .
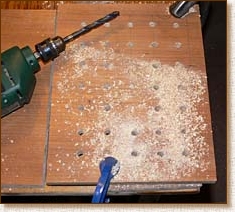
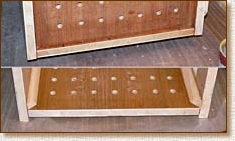
Fiddly bits: 3. Floor Mother's clean (she goes elsewhere), but owl chicks do quantities of wet poo and this can end up smelling foul. So here's the tedious job of drilling drainage holes in the floor. I've done 3/8 inch holes on 4 cm centres. Drill through into spare wood clamped firmly underneath (as shown): it's perfect for stopping the backs of the holes breaking out. Whether these holes will do the job I don't know as I mistakenly relied on litter alone in my first box, and found it wasn't enough. But at least they should allow air up through the damp litter, helping it to dry and (hopefully) preventing the awful ammoniacal stench that can develop.
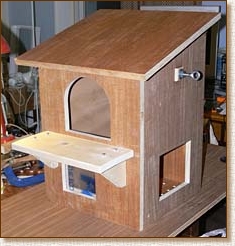
Pic opposite: The larger nestbox so far. The square cut below where the ledge is going to go is the observation port. It'll have a clear polystyrene pane fitted as I have a panel left over from a previous job. It's not supposed to be used outside, but I've had another pane outside for some time and it's survived. The front door is 16.5 cm across rather than 15, but that little bit extra looks just perfect to me. The wood I'm using (should have said earlier) is some pieces I found in the loft originally bought to do a kitchen. They're 3/4 inch panels of bonded 1.25-inch wood strips held between quite thick veneer on both sides. The result is very strong and unwarped board that's just ideal -- when properly sealed -- for a nestbox. And I was about to take them to the municipal dump! They weren't cheap either, so it's nice to put them to a good use. | ||||||||||||||||||||||||||||||||||||||||||||||||||||||||||||||||||||||
 | ||||||||||||||||||||||||||||||||||||||||||||||||||||||||||||||||||||||
 | ||||||||||||||||||||||||||||||||||||||||||||||||||||||||||||||||||||||
 | ||||||||||||||||||||||||||||||||||||||||||||||||||||||||||||||||||||||
 | ||||||||||||||||||||||||||||||||||||||||||||||||||||||||||||||||||||||
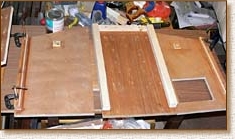
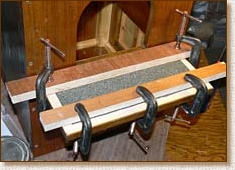
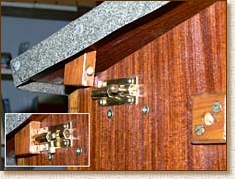
Five days later All the fiddly bits have been done and the boxes are ready for assembly. Here the bigger box is shown held together with sellotape so checks can be made that the panels are going to fit reasonably well (they do). I'll remove the ledge as it tips the front panel forwards (the supports are already glued and screwed). The bottom right photo shows what I've come up with for the sliding door, made from scrap pieces. It'll be fixed over the opening in the side panel after the box has been assembled. The eye bolts are to make hauling the box up into the tree easier and to hold it in place while it is attached to the trunk. During and after assembly the main job will be to install corner battens and other pieces -- 9 for each box! There's also the 4 eye bolts for the back, which go through the battens in the back corners. The roof goes on when everything else is finished. This is a big box. It's going on a fairly big oak tree, so maybe it won't look quite so large! | ||||||||||||||||||||||||||||||||||||||||||||||||||||||||||||||||||||||
 | ||||||||||||||||||||||||||||||||||||||||||||||||||||||||||||||||||||||
 | ||||||||||||||||||||||||||||||||||||||||||||||||||||||||||||||||||||||
 |  | |||||||||||||||||||||||||||||||||||||||||||||||||||||||||||||||||||||
 | ||||||||||||||||||||||||||||||||||||||||||||||||||||||||||||||||||||||
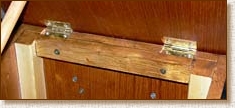
Two more days later. So many things to do before one can put the bl--dy thing together! I get over-perfectionist at this stage and predrill (after careful measurement) all the the holes for the screws that'll fix the panels together and prefit some interior pieces. The battens down the sides of the back (see right) have to be prefitted as four big holes for bolts must be drilled before the box is assembled, otherwise I wouldn't be able to drill them! (Don't want to drill from the back.) One has to make sure too that some screws won't hit other screws that need to be put in at 90° to them. Anyway, there we are ready for assembly tomorrow. A bit of a nerve-wracking job as several panels, dripping glue at the joins, are pulled together incrementally using the screws to get a fit that's as near orthogonal as possible taking into account all the small errors that crept in at the initial panel cutting stage. | ||||||||||||||||||||||||||||||||||||||||||||||||||||||||||||||||||||||
Back and side panels ready for assembly. I've used a lot of screws to fix the back battens behind the panel as the batten timber is like matchwood -- light and rather poor quality. | ||||||||||||||||||||||||||||||||||||||||||||||||||||||||||||||||||||||
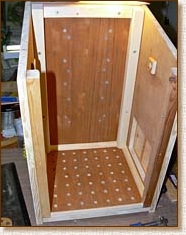 | ||||||||||||||||||||||||||||||||||||||||||||||||||||||||||||||||||||||
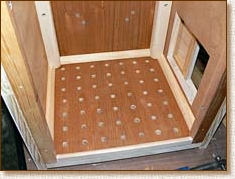
Assembly It's only at this stage that I feel I'm working on a nestbox! The two pics show the back, sides and floor glued and screwed. Trimming pieces around the floor are in place (they hide gaps and make the box a little easier to clean), and in the lower pic the sliding door is partly open. The overall fit has turned out to be quite good, with just a little rock on a flat surface. This is because I was keener to get the tops of the panels flush than the bottoms to minimise problems fitting the roof later. In either photo you can just see that the floor panel is raised about a centimetre. This is so that any water running down the sides can't travel under the base. Simply done by raising the floor on little pieces of wood during assembly. Top photo shows that there's a bit of work to do along the top of the back to get a uniform slope where the hinges for the roof will be seated. | ||||||||||||||||||||||||||||||||||||||||||||||||||||||||||||||||||||||
Assembling these boxes is always hair-raising. After much preliminary checking and with some strategically placed short (1") screws holding things in place, I glued and screwed panel by panel, pulling panels together with the short screws. The front panel was in place (but not glued at this stage) to ensure the fit. When I was happy with the fit I drilled pilot holes for longer (1.5") screws and used them to pull the panels tight. Lots of mopping up of excess glue! Then front panel off before fitting the sliding door and putting in last interior fitments. | ||||||||||||||||||||||||||||||||||||||||||||||||||||||||||||||||||||||
 | ||||||||||||||||||||||||||||||||||||||||||||||||||||||||||||||||||||||
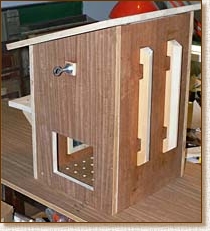
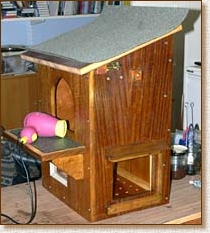
Assembly cont. Oops. Why did I ever say this box was going to be simple?! First pic on right shows everything pretty much completed. I decided to fit corner braces at the top front because I now have to cater for vandals, and structurally that was the weakest part. There's also a brace across the rather thin arch above the entrance door. The box has in fact turned out to be strong, and I'm pleased with it. | 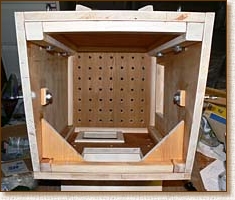 | 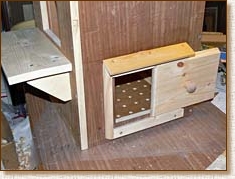 | ||||||||||||||||||||||||||||||||||||||||||||||||||||||||||||||||||||
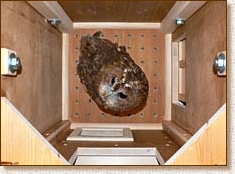 | ||||||||||||||||||||||||||||||||||||||||||||||||||||||||||||||||||||||
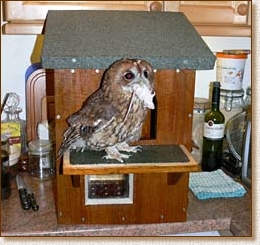
Top right: The hatch door was quite easy to make and works well. I've popped a little roof over it as my only concern is about water getting into the inward slope under the base of the door. Right: My box tester to show how an owl fits into this large box. She's shown foreshortened, but it's obvious there's plenty of space. She's looking annoyed because her mind was on a mouse I was warming up and she didn't want to be bothered with posing for photos. I haven't put in any slats on the front panel to act as a ladder as the beauty of these boxes is that the door is within easy reach of an owlet -- they'll have no problems jumping that far. | ||||||||||||||||||||||||||||||||||||||||||||||||||||||||||||||||||||||
The corner braces will come in handy if one wanted to put in a camera or microphones as a ceiling panel can be placed on them and another piece across the back. Pretty much all that remains now is to sand the slope for the roof and attach it, and then to apply sealing finishes. | ||||||||||||||||||||||||||||||||||||||||||||||||||||||||||||||||||||||
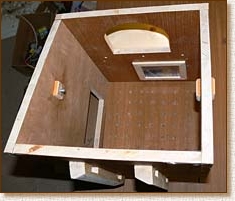
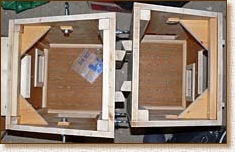
Some days later: Now that the smaller box has been assembled here are some pics to show the relative sizes. The smaller box can be thought of as the large box with 6 cm (2 3/8 in) sawn off the back to front measurement. In all other respects it's the same except that the front panel is obviously a little taller as the roof slope is the same. The two pics below right show the boxes side by side and looking down. There are no front corner battens in the smaller box because the triangular braces should be quite sufficient. One other difference: the door slides to the front. The pic on the left shows the recessed floor, which will stop water running under the base. The smaller box is for my owl tester when she goes out later this year. The floor dimensions are about the same as our first box and I think it's the ideal size. It has the advantage that it's less heavy to hang and sticks out less from the tree. | 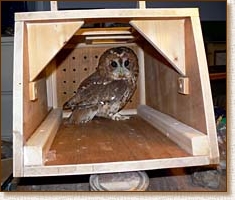 | |||||||||||||||||||||||||||||||||||||||||||||||||||||||||||||||||||||
 | ||||||||||||||||||||||||||||||||||||||||||||||||||||||||||||||||||||||
 | ||||||||||||||||||||||||||||||||||||||||||||||||||||||||||||||||||||||
 | ||||||||||||||||||||||||||||||||||||||||||||||||||||||||||||||||||||||
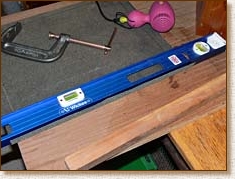
With the body of the boxes assembled and the inner fitments done, I used a sanding disk to finish off the slope for the roof. This involves some checking with the roof panel on and careful marking of irregularities that need to be sanded off. A tricky job, and a slight wobble on the roof is probably unavoidable. Sand with caution as a disk can eat a dip into a top edge in seconds! I did final sanding by hand with coarse sandpaper wrapped round a section of batten to fine tune the flatness of the top edges. | ||||||||||||||||||||||||||||||||||||||||||||||||||||||||||||||||||||||
 | ||||||||||||||||||||||||||||||||||||||||||||||||||||||||||||||||||||||
Finishing off As the next pics show, since the last set I've applied yacht varnish (external spirit-based polyurethane) inside and out. When this has thoroughly dried out, as far as I know it's inert, gives off no vapour and is harmless. The reason for applying it inside the box is to protect the wood against owlet poo and to make the interior easier to clean, and outside it obviously prolongs the life of the box considerably. I apply it thinned with about 25% white spirit so it's more penetrating. Unfortunately there's only one exterior finish, which is gloss. I don't feel comfortable with glossy owl boxes, so after the second coat, before much gloss has been able to build up, I'll be sanding down and then rubbing on a very thin last layer with kitchen wipe. Messy, but it gives a nice matte/silk finish. Upper right: The ledges are getting a patch of roof felt with a band of bare wood round the edges. This is to signal to owlets that they should maybe be careful when their toes reach the perimeter of the ledge. Pernickety, but I get quite worried about owlets falling to the ground! At the Barn Owl Centre in Gloucestershire I believe they're putting strips of wood around the edges of ledges as young Barn Owls are apparently even more inclined to step into the blue. To stop the slate chips on the felt blunting the parent owls' claws it's getting a couple of coats of varnish. Next two pics: I hate doing the rebates for internal hinges as I have no special tools to dig them out. But I prefer them protected rather than out on the back of the box. I ended up having to raise the base of a couple of the rebates with woodfiller. You might prefer to mount your hinges outside. I use the brass-finish hinges as they seem to resist corrosion quite well. They (or steel ones) can always have a little grease rubbed over them before the box is put outside. The middle pic shows how to get an orthogonal fit of the roof on to the box using a straight edge. At this stage I'm screwing the hinges down on to the roof panel with the other end of each hinge snug but unscrewed in the rebate on the back panel. Then I'll screw into the rebate. | ||||||||||||||||||||||||||||||||||||||||||||||||||||||||||||||||||||||
 | ||||||||||||||||||||||||||||||||||||||||||||||||||||||||||||||||||||||
 | ||||||||||||||||||||||||||||||||||||||||||||||||||||||||||||||||||||||
Felting the roof: The roof doesn't have to have felt on, but I have a roll in the house left over from our first nestbox, and it certainly helps to protect the box from the weather. I also think it looks nice, so on it goes although it's a bit of a tiresome job to do. First I cut a carefully measured (and orthogonal!) piece that was 3 cm wider all round than the roof panel. The back of the felt can be marked by scoring with a biro and then it's easily cut with a large pair of scissors. This'll give about a 1 cm free edge of felt below the roof panel, which is all that's needed to deal with rain drips. | ||||||||||||||||||||||||||||||||||||||||||||||||||||||||||||||||||||||
 |  | |||||||||||||||||||||||||||||||||||||||||||||||||||||||||||||||||||||
 | ||||||||||||||||||||||||||||||||||||||||||||||||||||||||||||||||||||||
Top left: The cut felt on the roof. Before putting it on I'd marked (scored) lines on the soft underside and 3 cm in from each edge to align it on the roof panel. The score lines will also help with the bending. The secret here is a hair dryer. Top right: After heating along the line that's going at the back of the box I bent it back against a straight edge and clamped against a batten for about 5 minutes while I had a cig (and the bitumen cooled). Middle right: Then I put the felt on the roof with the bent section hooked over the back and, after careful checking with the scored lines under the felt, I partially banged in some clout nails at back and front to hold things in place. After that it's just a matter of carefully working along each edge with the hairdryer and getting a neat bend when it's hot and supple. After getting clout nails into the midle of each side, I did the corners. It's surprising how easy it is to get a neat corner tuck once the felt is hot (lower right). After settling the corners at the end of a side I bent that side and tacked it down along its length. Direct the dryer both above and below the bit you're working on to get the whole thickness warm and malleable. Warming the slaty side prevents cracking. Heat and pinch all along the 90° bend to get a nice tight fit. Fingers can get fairly hot at times, but I wouldn't say it's a very taxing job. A minute or two with the hair dryer on a medium setting will get the felt perfectly workable. The corner tucks need the felt a bit warmer -- heat for a couple of minutes until it's soft and bends readily. | ||||||||||||||||||||||||||||||||||||||||||||||||||||||||||||||||||||||
 | ||||||||||||||||||||||||||||||||||||||||||||||||||||||||||||||||||||||
 | ||||||||||||||||||||||||||||||||||||||||||||||||||||||||||||||||||||||
Bolts for the roof: I decided the roofs must be held down as nothing would disturb a mother owl so much as a roof that banged in the wind. On the right is my slightly kludgy fix. I would have preferred to have the bolts inside (fixed to the roof with the barrel slotting into a hole drilled in the front panel), but the way I've done the inside means I couldn't do it that way. There's only one bolt on each box -- the second side doesn't have one. Looks fairly simple but took an age to do! | ||||||||||||||||||||||||||||||||||||||||||||||||||||||||||||||||||||||
Bottom right: Finshed at last! The smaller box is on the right. My attempts at puttying can also be seen -- this'll eventually get some woodstain and then vanish on it but not until it's drier. Right: 2 am and time for a little celebration. I won't pretend the boxes have been quick to make, but I like them and they're good additions to our little stable. The next pics will show the big box up in its tree. Sophie's box will be put up later in the year. | ||||||||||||||||||||||||||||||||||||||||||||||||||||||||||||||||||||||
 | ||||||||||||||||||||||||||||||||||||||||||||||||||||||||||||||||||||||
 | ||||||||||||||||||||||||||||||||||||||||||||||||||||||||||||||||||||||
Both boxes are satisfyingly sturdy and the varnishing means they should last a lifetime with very little maintenance. Having hit on the idea of varnishing the ledge pads I've also put one coat on the roof cover as it should stop the little chips of slate coming off. One small problem is that there isn't enough clearance at the back to open the roof fully -- the felt overhang touches the back of the box when the roof's at about 70°. That doesn't really matter as I rarely need to open the roof when the box is in the tree and the side hatches will provide all the access that's needed. The felt could always be cut back closer to the back edge of the roof if necessary. More when the big nestbox goes up in about a week's time. . (written 5 Feb 2008) | ||||||||||||||||||||||||||||||||||||||||||||||||||||||||||||||||||||||
The fun part (ha ha) -- putting the boxes up We finally got round to putting the nestboxes up on 12-14th February and were lucky in hitting a pretty nice spell of weather -- it does help! There were three to do as I'd realised I could put up Sophie's (smaller) box for the owls that live near the house . . she won't be needing it until later in the year. The house owls actually already have a box but didn't use it last year as they didn't breed. It'll be interesting to see which box they choose if they do start a family this year. The third box -- the small yellow one in the pic below -- is our main nestbox. It had to be moved because of vandals. | ||||||||||||||||||||||||||||||||||||||||||||||||||||||||||||||||||||||
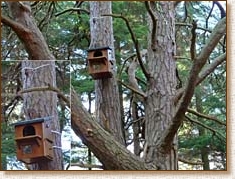
A comparison of our boxes. In the first pic on the right the two Dutch boxes are compared with our first box, which has been out since Nov 2004. The smaller letterbox is in the middle. The second pic compares the smaller Dutch box with a standard English letterbox made by Jamie Wood (eBay store, no longer operating when last checked). This is about the best of the commercially made boxes as far as dimensions go. We're not using it as I wouldn't inflict any tube type design on our owls. |  | 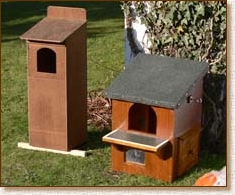 | ||||||||||||||||||||||||||||||||||||||||||||||||||||||||||||||||||||
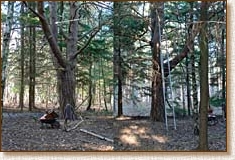
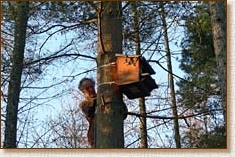
The big box goes up for the North Wood owls The first box we put up was for a pair we don't really know. They produced a delightful couple of chicks in 2004, but we never saw the parents and have no idea what they've done since by way of breeding. Their box has gone up in a magnificent pine near where the 2004 fledglings were, so if they use it it'll give us an excellent chance of finding out more about them. | ||||||||||||||||||||||||||||||||||||||||||||||||||||||||||||||||||||||
 | ||||||||||||||||||||||||||||||||||||||||||||||||||||||||||||||||||||||
 | ||||||||||||||||||||||||||||||||||||||||||||||||||||||||||||||||||||||
 | ||||||||||||||||||||||||||||||||||||||||||||||||||||||||||||||||||||||
 | ||||||||||||||||||||||||||||||||||||||||||||||||||||||||||||||||||||||
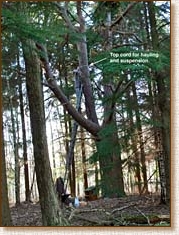
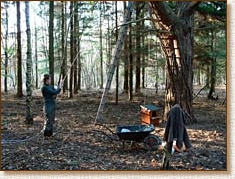
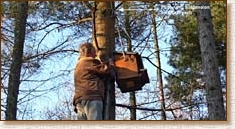
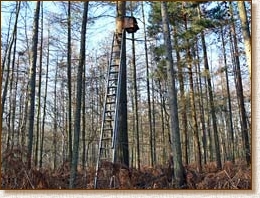
The first step is to put up the cord that holds the suspension ring, an aluminium ring about 2 inches in diameter from which the box will be suspended. The cord can also be used to take a small pulley, which makes hauling a heavy box up much easier than it might otherwise be! Once the box is suspended in place it's quite easy to tie the cords round the back that hold it firmly against the trunk. I can't stress enough the importance of securing the ladder against the trunk -- it's just dangerous not too. Take up about 10 ft (3 m) of cord to do this. Pass the cord round the trunk and lash a turn or two around the top rung and/or tops of the ladder side bars. It' the first thing you need to do each time the ladder is positioned. Don't rely on someone holding the ladder as they won't be able to stop it slipping round the trunk and then you could be in big trouble. To haul and attach you need lots of cord. We used white nylon (I would have preferred black), with a long double thickness used for hauling. I estimated 60 m to fix three boxes, but was glad to have a 100 m roll. Corinne (on the ground) hauled the box up while I (on the ladder) held it away from the trunk and helped with a bit of pulling. When it's about where you want it you tie it in place using the aluminium ring and the side eye bolts. Lashing the box to the trunk using the back bolts is then quite simple. The only problem was that I had to use a "needle" -- a short thin twig -- to thread the cord through the recesses in the battens. After working from one side I moved the ladder round to the other side to tighten the cord round the trunk and do the final knotting to the eyebolts on the other side of the box. I used thin plastic-coated garden wire to secure the loose ends of cord to guard against any chance of knots working loose -- the nylon cord is quite slippy. | ||||||||||||||||||||||||||||||||||||||||||||||||||||||||||||||||||||||
 | ||||||||||||||||||||||||||||||||||||||||||||||||||||||||||||||||||||||
I won't say it was a totally simple job as it wasn't! The main probems were the weight and bulk of the big box and the larger than expected girth of the trunk (14-15 inches), which made it difficult to pass cord round the back and especially to feed the cord through the batten recesses. Hauling the box up was made considerably easier by the pulley, which I just happened to have but we had to go back to the house to fetch as I've never had to use it before. The beech in which the main (yellow) nestbox used to be was an altogether easier place to work as I could reach all parts of the box by moving to another branch -- there was no need to move the ladder.
Mrs Owl's box moves to a new location Our very first nestbox had to be taken down because the video cable was attracting the attention of a local vandal. It's not one of the Dutch letterboxes of course, but here are some pics nonetheless. The tree we chose is a Scots Pine about 80 yards from the beech where it used to hang, but it's better concealed and the box is completely inaccessible from the ground. It's also about 20 yards from the route Mrs Owl takes to fly in to her nesting area, so there's a good chance she'll spot it, especially when the tent gets put up again! The tent is my hide for observing and recording at this nestbox and was used very successfully in the 2006 nesting season (see the Nesting Diary). This owl pair are the parents of Sophie, my box tester. That's the mother in the selection on the right. (More on her 2008 nesting below) | ||||||||||||||||||||||||||||||||||||||||||||||||||||||||||||||||||||||
 | ||||||||||||||||||||||||||||||||||||||||||||||||||||||||||||||||||||||
 | ||||||||||||||||||||||||||||||||||||||||||||||||||||||||||||||||||||||
 | ||||||||||||||||||||||||||||||||||||||||||||||||||||||||||||||||||||||
 | ||||||||||||||||||||||||||||||||||||||||||||||||||||||||||||||||||||||
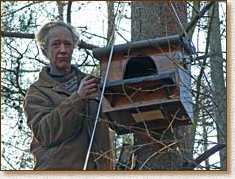 | ||||||||||||||||||||||||||||||||||||||||||||||||||||||||||||||||||||||
Some stages in putting up the nestbox. The trunk is not too big and the box is comparatively light, so the job was straightforward. Left: After 5 weeks of living, eating and dreaming nestboxes you get to look like this! | ||||||||||||||||||||||||||||||||||||||||||||||||||||||||||||||||||||||
With this tree there was no need for a fixing cord above the box as there was a convenient branch to suspend it from.
Sophie's box for the house owls Sophie won't be needing her box yet so we put it up for a pair of owls who roost near the house. It went up on the one dull day we had, so photos will come later. The fixing job was like Mrs Owl's box and was very simple -- the tree is another Scots Pine with a 12-in diameter trunk, though in this case a suspension ring was used.. The box is about 50 yards from another one we put up for them last year but which they didn't use as they didn't breed. This is a modified chimney box fixed sideways to give more room. It'll be interesting to see if they show a preference for one over the other.
This year's Tawny Owl Nesting Diary (2008) The first hint that Sophie's mother might be using her nestbox this year came on 14 March, and on 19 March we got our first definite view of her. So I've started up a new diary to record this owl pair's activities. Mrs Owl's box and how we put it up in its new location are shown in the pics immediately above. | ||||||||||||||||||||||||||||||||||||||||||||||||||||||||||||||||||||||
powered by owls | ||||||||||||||||||||||||||||||||||||||||||||||||||||||||||||||||||||||
Nestboxes
for
Tawny
Owls
The Dutch letterbox