 |  | |||||||||||||||||||||||||||||||||
 | ||||||||||||||||||||||||||||||||||
 | ||||||||||||||||||||||||||||||||||
The method used to attach the box to the tree should keep the nestbox rock steady and safe from falling. Several methods are used, and they're described here. | ||||||||||||||||||||||||||||||||||
A word of caution about using cord to fix nestboxes Since writing this page we've had a squirrel chew through some nylon cord. This was actually being used to tie a feeding ledge to a tree, but the message is clear enough: better to use wire or chain if for some reason you can't use nails or screws. | ||||||||||||||||||||||||||||||||||
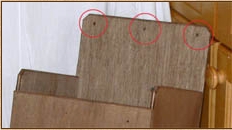
Single back bar Probably the most often used, this form of attachment has the advantage of simplicity. A plank of wood 3-4 in wide fixed to the back of the box is nailed or screwed to the tree trunk. The plank should be thicker than the wood used for the box (say 3/4 inch) and extends above and below the box. The upper extension should be longer as it takes most of the strain, and should therefore have more screws put through it (at least three, as shown in the photo) than the lower extension. This form of attachment is not suitable for roping or wiring. (Illustration from photo by John Baker) Disadvantages: Prone to side-to-side rocking, e.g. in a strong wind. To minimise this the horizontal pairs of screws or nails should be placed as far apart as possible. A further problem arises here in that on a narrow trunk screws placed away from the centre line may not go far enough into the tree trunk to be secure. | ||||||||||||||||||||||||||||||||||
 | ||||||||||||||||||||||||||||||||||
 | ||||||||||||||||||||||||||||||||||
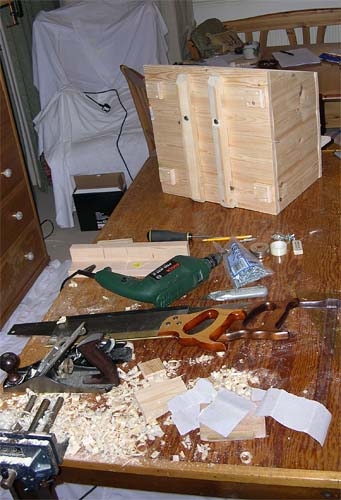
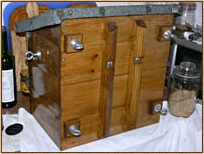
Double back bars or battens A method I came up with to get round the problem of rocking by having two lines of contact with the tree trunk. The battens are placed about 4 inches apart. Suitable for roping or wiring. More on this method below. Disadvantages: Extra carpentry. A camber on the battens is recommended to give a better fit to the curvature of the trunk, and to find the best angle of camber for the tree it helps to draw a scale diagram based on the trunk diameter (see below). (Note: The picture shows an attempted conversion on a chimney box which I've since abandoned, but it does show the battens quite nicely) | ||||||||||||||||||||||||||||||||||
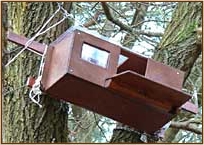
Direct screwing or nailing through back panel As shown here with this chimney box, this method is not recommended as the side screws or nails are going to go through a lot of air before they bite wood. A simple way to get round this would be to place the outer screws closer together. The attachment is then essentially the same as the single back bar method above. In one well-known owl cam box the nestbox is screwed through the back panel from the interior of the box. This has obvious aesthetic advantages (no fixing bars needed) but requires a large entrance opening if it's to be done easily. Disadvantages: As for single back bar. A further problem is that the 9-mm ply in the example on the right could lose its integrity with age, weakening the attachment. | ||||||||||||||||||||||||||||||||||
 | ||||||||||||||||||||||||||||||||||
Platform mounting An intriguing method illustrated here with a nestbox from Devon. This is a method for placing the box between two branches. The advantage of this method is that it provides a fixture that's completely steady in high winds and is also probably quite easy to set up. Disadvantages: Only suitable for low-profile boxes like the one shown. Might get a little fussy in the detail. For example one needs access through the box to be able to screw it down onto the platform, and the supports might be too far apart, requiring cross-supports. | ||||||||||||||||||||||||||||||||||
 | ||||||||||||||||||||||||||||||||||
 | ||||||||||||||||||||||||||||||||||
Cross bars Another suggestion of my own, this is another method for fixing a box between two branches. Suitable for screwing (or nailing) and roping. Nb there are two bars in the photo, one at the top and another, shorter one below. Disadvantages: Bl--dy fiddly! The branches have to offer four points that all lie in the same vertical plane or padding will be required. Worth considering but not recommended unless the type of position shown in the photo is the only option. I've since abandoned this nestbox site (and the box!). | ||||||||||||||||||||||||||||||||||
Roping and wiring Attachments using cord and wire have two advantages: they don't damage the tree, and no screws or nails have to be removed to undo the fixture. On the other hand they may need extra fitments on the box, like eyebolts (below), to make the attachment. I've tried two types of cord: nylon and polyester. Nylon tends to come in white only, but it's more flexible and longer lasting than polyester. Polyester is stiff and slippery, and so knots attempt to unravel themselves. As nylon doesn't have these problems I much prefer it. Wind the cord more than once around the tree trunk or branch to get a completely secure (non-slipping) attachment, as shown in the pics below. Knot ends can be secured with garden wire. | ||||||||||||||||||||||||||||||||||
 | ||||||||||||||||||||||||||||||||||
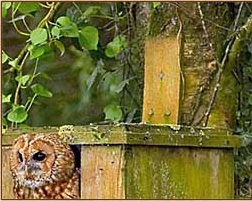
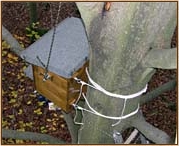
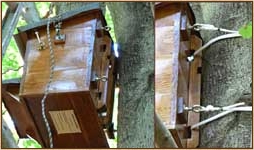
Double back battens with roping The method used on our main nestbox. Complicated to engineer, but it's proved to be an excellent and totally reliable fixing. I used this method because the tree is not our property and must not be damaged. Note also the vertical haulage and suspension cord. This goes through a ring tied to a branch above. It's left in place for extra security. A method for cutting an accurate camber on the battens is shown at the bottom of the page. Disadvantages: Time-consuming carpentry and bolt-fixing; can also take longer than other methods to set up in the tree. | ||||||||||||||||||||||||||||||||||
 | ||||||||||||||||||||||||||||||||||
 | ||||||||||||||||||||||||||||||||||
Cord or wire? Wire is often suggested as the means of attachment for chimney boxes when they are slung under a branch. As noted at the top of the page, wire is squirrel proof and should probably be used. For the time being I shall continue to rely on the security of having three fixing cords, which provides an element of redundancy. So far no cord on our three nestboxes has been chewed! | ||||||||||||||||||||||||||||||||||
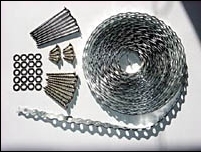
A hybrid method: metal band with screw holes Available from the Wheatear accessories page (very slow!), the MP07 Band Pack is a 5-m length of galvanised metal with 5-mm holes along its length. 1-in screws are used to attach the band to the box and 2-in screws to attach the band to the tree. The £3.99 pack includes screws and washers. (Wheatear sells one of the few letterbox nestboxes with reasonable dimensions for tawnies -- see Page 9: Commercial box review.) Comment: This looks an interesting and possibly convenient attachment, but its long-term security depends entirely on how long the galvanisation stands up to the weather. Once that goes and the band starts to rust, catastrophic failure is on the cards. Regular inspection at close quarters would be essential, especially after a year or two in place. | ||||||||||||||||||||||||||||||||||
 | ||||||||||||||||||||||||||||||||||
More on double-batten fixing This is the type I've used on my main nestbox (photo at right). Properly done, it gives a really good grip on the tree, largely eliminating any tendency of the box to rock. But it takes a little longer to make. These battens should be cambered (see below) using a disk sander or small plane (preferable). To make the battens you need a length of square-section 1.25 in (30 mm) timber. When cut, the two battens stop short of the top and bottom of the box. For most tree trunks they will be placed 4-5 in apart. I'd strongly recommend not choosing a trunk more than a foot in diameter as you may find it difficult to get your arms round it when fixing the box. You need to be able to pass the cord or wire around the trunk. If you can't pass it from one hand to the other round the back of the tree the job becomes almost impossible!
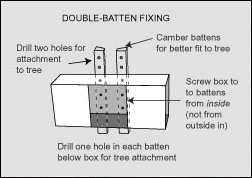
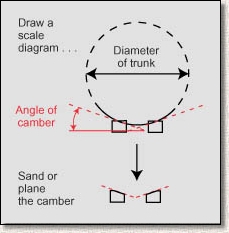
How to get the camber You can make a guess at the angle of the camber, but a good idea is to draw a scale diagram like the one on the right. From this you can measure off the angle that fits the diameter of the trunk you have chosen for the nestbox. You'll need to measure the diameter of the trunk. Draw a circle (or part of it) with this diameter and add scale drawings of the battens in cross-section. You will probably find they're best with their centres about 4-5 in apart. The intersection of the curve of the circle with the battens gives you the camber. Measure the angle of a line that represents the average angle of the curved intersection. If you can't do this, use an angle of 25-30°. When that's done, make the camber and attach the battens to the back of the box using three screws down each (diagram above). As before screw from the inside of the box out into the battens. To take the nails or screws that'll attach the nestbox to the tree, drill two holes into the top of each batten and one into the bottom. | ||||||||||||||||||||||||||||||||||
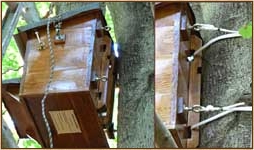 | ||||||||||||||||||||||||||||||||||
Double-batten fixing on my main nestbox, here used with a cord attachment. A snug, non-rocking fixing can be obtained (right). | ||||||||||||||||||||||||||||||||||
 | ||||||||||||||||||||||||||||||||||
And finally . . . ! If you do use the double batten fixing you need to watch out that it gives enough room between the box and the tree to allow the roof to be opened — if you make one with a hinged roof that is. I actually have a small problem opening up the roofs of ours as there isn't quite enough clearance. In fact it's hardly a issue as one doesn't often need to open the roof in situ. A side door should provide all the access you need for, e.g. basic cleaning out and replacing bedding. Having an openable roof is useful when the box is down for major repairs, resealing, serious scouring out and modifications, like installing a camera. | ||||||||||||||||||||||||||||||||||
powered by owls | ||||||||||||||||||||||||||||||||||
Nestboxes
for
Tawny
Owls
Photo: The tree attachment on my first box is a little elaborate but it's worked well, providing a rock-steady fixing for a heavy box.
Attachments