 |  | |||||||||||||||||||
 | ||||||||||||||||||||
 | ||||||||||||||||||||
Getting a nest box up into a tree and fixing it isn't as easy as you might think . . . | ||||||||||||||||||||
THE BUSINESS OF LIFTING AND ATTACHING a large, heavy box 15-20 ft up a tree is not to be undertaken lightly. In fact it can be quite risky, and unless you are sure of what you're doing someone else should be present. A fundamental problem is that you're trying to attach a large square object to a round trunk. It would be difficult enough on the ground, but you're going to be perched precariously some way up a tree. Here are some tips that could save a lot of trouble. | ||||||||||||||||||||
1. Select the site in advance Ideally you should have a site in mind before buying or making the box. If buying a box, the site will to some extent be determined by the type of attachment that comes with it. This is often a back batten or plank with holes for nails or screws above and below the box. So before buying find out how the box is attached. If making a box, it may be the other way round: the site may determine what type of attachment is best to use. Making a box will obviously give you more flexibility in tailoring the attachment for a site that's available. When choosing a site don't forget the factors that may affect which way the box is to face. These are the bad weather directions (not a concern in sheltered sites) and where the adults' territory is -- i.e. where they hunt. Both our nestboxes are in corners of the parents' territories and I like to face the boxes in the direction the male will come from when he brings food. A female may feel uncomfortable if her box faces a rival pair's territory. The growing strength of the sun in late April/early May can create stifling conditions in a nestbox. This is a time when there's very little shade from leaves, so it's not easy to do much about it apart from avoiding south or southwest-facing positions. This is a particular problem with deep, poorly ventilated designs like the letterbox. Another consideration is easily reachable perches for the fledglings when they emerge. On lower sections of trunk, like the Scots Pines', there may be none, of course. This is one reason why I'm very in favour of giving nestboxes ledges. There's nothing as dismal as finding an injured chick on the ground. The type of tree doesn't seem to matter to the owls, though a site with some nearby perches will probably be preferred. The parents tend to fly straight to the ledge or door. Binos are useful when choosing a site.
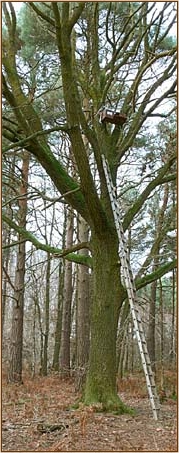
2. Not too high! Don't aim too high -- which means think a height limit of about 15 ft to no more than 20 ft. If there are no convenient branches your ladder will determine how high you can work, so measure its length at its maximum safe extension. The height you can work at will be less than this because the ladder will be at an angle, and the angle shouldn't be too steep. If there are branches that will allow you to attach a box some way above the top of the ladder, remember that you'll have to climb down every time you drop anything, which will happen at least once! Also bear in mind that in future you're going to have to get up to inspect the box and every 2-3 years bring it down for more thorough inspection, cleaning and overhaul. You need to be able to work over the top of the box from the ladder (or if there's a branch you can stand on, from that). That means you should be able to stand with the box at chest height or lower. You need to be able to get your arms over and around it. The site should allow you to work from different positions if necesary, especially when cord or belt fixings are used. It may be difficult to work from the front of a nestbox that has a ledge because the ledge will push you out from the tree, making the task dangerous. In this case you must be able to work from the sides. Think about the method of attachment you're going to use and try to envisage how it will be done when you're up in the tree. Right: Working beyond safe limits! Despite considering this site for our second nestbox carefully, I found myself attempting an attachment to a site that's too high for the ladder, which is angled too steeply. It looks as though there are enough branches under the box to make this unimportant, but once up there I found they weren't quite in the right places! So this box is going to have to come down a few feet.
3. Find a nice bit of trunk Look for a section of trunk that's a minimum of 10" diameter and as smooth and vertical as possible. Smooth means both smooth bark and free from knobbly bits or bends. Oaks have rough bark with deep fissures, so on oaks look for somewhere where the ribs have a more or less even top surface (if you see what I mean). The fatter the trunk the less the curvature and the more likely you are to make a good attachment. This applies especially if screws or nails are going to be placed rather far apart horizontally. For greater curvature (narrower trunks) consider a twin-batten attachment (two bars at the back) as then you get two lines of contact with less risk of rocking. Nestboxes can be attached to smaller-diameter trunks but with some attachments you may run the risk that the box will rock from side to side.
4. Check at ground level that screws or nails can be driven home If using nails or screws to make the fixture, it might be a good idea to check that you'll be able to drive them home on a section of trunk near the ground. Living trees and their bark can be very, very hard, and you may well need a cordless (battery-driven) drill. Remember too that fixing a heavy owl box will need screws at least 2" in length, and preferably 2.5" or longer. It partly depends on how fissured the bark is and how soon you meet solid inner wood. If screws or nails go in easily it's almost certain that they won't make a safe fixing. Roping the box with nylon cord or belt gets around this problem and does no damage to the tree. Screws are easier to remove than nails. Nails may be easier to bang in, but if you want to use them give a thought to the problem of how you'll get them out when you need to take the box down.
5. Secure the ladder before working If you have to prop a ladder against a trunk rather than a branch, never work from it until you've secured the top with cord or rope. It's suicide not to -- the ladder may slip round the trunk and send you crashing to the ground. This is especially likely if the top rung (as opposed to the tops of the two side bars) is the only part in contact with the trunk. It's not enough to have someone holding the ladder at the bottom. Take out enough spare cord or rope to do this. It's often a good idea to secure the ladder even when it's apparently safely propped against a branch.
6. Haulage fitments on the box This is something that also needs to be considered in advance. Without a shred of doubt, the best, safest and easiest way to get the box up into the tree in the first place is to haul it up on a cord or rope. Don't try to carry it up with you. Doing this will allow you to hang the box temporarily and securely in place while you work on the permanent attachment. You can't work on fixing the box in place if you're having to support it with one hand! On some boxes the fixing bar(s) or roof overhang, or a combination, will allow you to simply run a loop around these projections so that you can haul it up. On other boxes it's a good idea to fix an eye bolt in the roof over the centre of gravity, or a couple of eyebolts, one on each side near the top in about the middle. The hauling rope is attached to these. Using eyebolts as opposed to just tying rope around the box has the advantage that (if you get the positions right!) the box will hang more or less level while you work, rather than at some awkward angle. Two pics at right: Hauling bolts and attaching bolts on our main nestbox. The eyebolts on the side are perfect for lifting the box into place, and the back bolts allow a non-damaging attachment to the tree with nylon cord. As shown in the lower photo, the suspension cord can be left in place to provide total safety for the owl family. This photo also shows how the attachment cord is wound two to three times around the trunk before knotting to the opposite eyebolt to provide an immovable (non-slipping) fixture. Using ratchet straps (useful tip from a reader) Ali C writes: "When lifting the box into the tree, use a ratchet strap wrapped vertically round the nestbox and passed through a loop at the end of your lift rope. Use a second if the box is an odd shape and ensure they are looped through to rope at the centre of the roof before ratcheting up tight. This way there will be enough friction to stop the box slipping out and ensure it lifts vertically. Unlike lifting eyes screwed into the nestbox, the straps are removed when the box is fixed in the tree." See Ali's nestbox (a rather superior Dutch letterbox) here.
7. A temporary fixing point in the tree You need a point in the tree from which you can hang the box while you work. This suspension point can be a branch above where the box is going to go. Alternatively, tie cord around a branch or the trunk above where the box is going to go and use it to fasten a metal ring or pulley in place (I use an aluminium ring about 2" in diameter). It's a good idea to leave the haulage ring in place so the box is easy to get down for its major checkovers. As I leave the ring in place I also leave the suspension cord as a failsafe in case something else gives way.
8. Hauling the box into place Pull the box up when you're in the tree. That way you can guide the box to avoid banging into obstacles. This can be little tricky as the box tends to rotate on the cord. Take care not to damage the box during this stage. You could haul it up from the ground using a pulley but you couldn't then guide it round obstacles or keep it away from the trunk. So doing it from up in the tree is best. When the box is where you want it, tie it in place and you're ready to go.
9. The actual fixing I can't really give guidance here as what you do will depend on the attachment method that's being used for the box. But at some point during the fixing it's wise to check that the box is level. For this you could use a spirit level, but the simplest way is to get whoever's on the ground to eyeball your handiwork from the front and side. Make any adjustments before making the fixture permanent. Remember that not having the box level may mean that wet chick poo will pond along a side or in a corner if there's no drainage point there. Obviously, before finishing up check that the fixture is as secure and steady as you can make it. Check particularly for side-to-side rocking. Loose or insecure fixings are a no-no, and if there's no way of making the fixture secure you'll have to think about redoing the whole job. Owls face enough hazards in their daily lives and you don't want to add to them. Driving screws home in a tree (another useful tip) Doing this can be a nightmare when you only have one hand to work with and the angle you're working from adds to the complications. Again, I have Ali C to thank for these useful hints: "These days I assemble exterior wooden items using a decent cordless drill/driver and wood screws, not the usual cross-head Philips or Posidrive as these 'cam-out' and damage both screw and bit far too easily. Nowadays I use only Spax T-star or torx screws which have a star shaped slot and these will not slip out even if the driver is out of alignment or if I don't push hard. I can do this even when up a ladder and with one hand. "For fixing to the tree, a similar improvement is provided by exterior grade Timberfix wood screws that act like bolts. In fact, with a hexagon bit in the drill, these will screw into wood without a pilot hole, are tastefully coloured green and have a built in washer to spread the load, making them ideal for holding box and batten directly onto the tree trunk. My 18-volt drill was able to drive these home with one hand for the drill and one for me."
10. Litter I put in some handfuls of litter -- leaves and some small twigs -- to a depth of a couple of inches or so. If everything's wet I collect half a shopping bag's full and put it on a radiator or blow a hair-dryer into it. Wood shavings are said to be ok, but not sawdust. Eggs are fragile, Mrs Owl will not bring her own litter, and a cosy place with natural litter will almost certainly be more attractive than a bare wood floor.
11. A final precaution . . . Saw off lower branches which vandals or nest-raiders could use to get a leg-up into the tree.
OTHER POINTS 1. Give the job plenty of time Fixing a nestbox up can take 1-3 hours or more depending on all sorts of factors. So, if putting a box up in winter, don't start too late in the day. A supply of coffee and hard tack like chocolate or biscuits can make things much more pleasant. Budget for a rest break. 2. Choose a nice day Cold weather, rain and wind are big energy-sappers. It's altogether more relaxing to do the job on a nice summer or early autumn day. Rain makes moss-covered trees slippery. 3. Not a job for the young! Don't ask, or allow, a young person (<18) to put up a nestbox. 4. Don't do it on an off day Only attempt the task on a day when you're feeling up to it. Call it off and leave it for another day if you tire and your judgment starts to go. It really can be that hazardous. 5. If things don't go to plan Unforeseen problems you meet while you're actually up fixing the nestbox may seem to be insurmountable -- e.g. you may find you can't reach parts you need to reach. In that case take a break and consider trying another place in the tree or another location altogether. Leaving it until another day and approaching the task with a fresh mind can solve the problem. You might also need to reconsider the attachment method you are using. | ||||||||||||||||||||
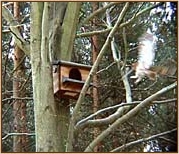 | ||||||||||||||||||||
The mother owl flying to our main nestbox in Spring 2006. The box was on a nice smooth beech trunk with a good selection of nearby perches. It was put up facing the hunting areas behind and to the right. In 2008 it had to be moved to another location because of vandals. | ||||||||||||||||||||
 | ||||||||||||||||||||
 | ||||||||||||||||||||
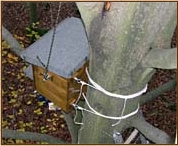 | ||||||||||||||||||||
Eyebolts on a box for lifting and attachment — see small text at left for explanation. | ||||||||||||||||||||
A word of caution about using cord to fix nestboxes Since this page was written we've had a squirrel chew through some nylon cord. This was being used to tie a feeding ledge to a tree, but the message is clear: better to use wire or chain if nails or screws aren't an option. | ||||||||||||||||||||
Links to sequences of pics showing owl nestboxes being put up Druid Labs, New Jersey: A Barred Owl box being put up by a professional. 27 pics. LPO Meurthe et Moselle Nord: Click on "Activités" in left panel, then on "Evènements passés" near top of page. Go to third item down for a sequence of 7 pics that shows a slightly strange-looking tawny box being put up in the snow. Shows pulley being used to hoist box. LPO means Ligue pour la Protection des Oiseaux. | ||||||||||||||||||||
powered by owls | ||||||||||||||||||||
Nestboxes
for
Tawny
Owls
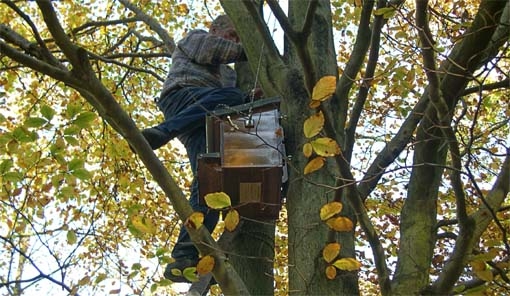
Our first nestbox going up in early November 2004.
Getting it up