 |  | |||||||||||||||||||||||||||||
 | ||||||||||||||||||||||||||||||
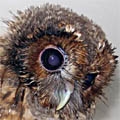
My thanks to Ali Cameron of West Dorset for sending in details of this very nice box which he made recently (August 2009) and put up at the edge of his garden. As can be seen from the photos, the nestbox has a rather attractive sheltered ledge. Ali kindly wrote up the description below, in which he also gives some useful tips on construction and attachment methods. There's a single-page plan at the end of the article. As a quick guide, the box is 66 cm (26 in) high at the back, 45 cm (17.7 in) wide, and 30 cm (12 in) from front to back in the narrower base section. That gives a very generous 51 cm (20 in) internal diagonal across the base of the box. | ||||||||||||||||||||||||||||||
THE NESTBOX WAS ADAPTED from various designs to be built largely from shiplap cladding as this allows a complex shaped box to be easily cut and assembled. The design takes into consideration the size of the tawny owl as the lower box is approx 30cm x 45cm (OD), much more than enough but with space to allow a nestbox camera to be placed back from the nest to provide a natural perspective rather than using a wide angle lens to get the whole scene in shot. | ||||||||||||||||||||||||||||||
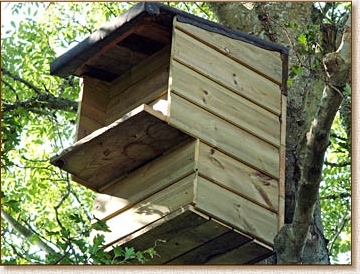 | ||||||||||||||||||||||||||||||
The nest compartment (the lower part of the box below ledge level) is 22 cm deep, the shiplap panels each spanning 11 cm. The roof, rear panel and landing shelf are ordinary planks of various width and thickness. All of these were assembled onto battens and clamped together before screwing in place. The base is also made from recycled planks, which are spaced slightly to allow drainage. The landing shelf, a key feature, goes across the full width of the box and is sheltered from our prevailing westerlies by the overhanging roof and extended sides. | ||||||||||||||||||||||||||||||
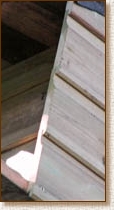 | ||||||||||||||||||||||||||||||
Shiplap, widely used for the better class of garden shed, is relatively cheap and available in lengths up to 4.8 m — enough for this box. As shown in the detail on the left, upper panels overlap the panel beneath so as to shed rain water and provide a simple draught-free cladding which is both neat and rural in appearance. Plans for the box can be found lower down, after the main article. | ||||||||||||||||||||||||||||||
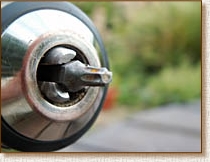
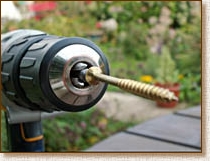
Construction tips All fixings are by screws — far more practical than staples or convenient than wood glue. But a newish development makes the modern wood screw particularly suited to nestboxes. The box shown is held together with exterior grade torx-headed screws from the Spax T-star range. These do not have a screwdriver slot or crossheads like Posidrive or Philips but have a star-shaped hole in the head instead. So the bit has star-shaped splines and slides into the head of the screw. In the lower pic a cordless drill holds the bit directly, but there are many hexagonal holders with a magnet to hold the bit, giving extra reach and the ability to change the bit easily. Unlike Posidrive or Philips bits, this is rarely needed; the bit shown on the right above is worn by probably over a thousand screws and about year’s usage, but it still drives without slipping. No cross-head driver can claim that kind of performance. Why? Well, when Posidrive and Philips introduced their crosshead systems the power tools of the time were deemed to be too powerful, so the design limited the amount of torque that could be applied by the driver. Too much and the driver twisted out of its slot, often damaging both the screw and the bit. In practice this sort of damage became accepted, especially with self-tapping and countersinking screws being developed. Next, torx-headed screws were developed after the advent of cordless drills, and with them came a clutch system to limit the effort the drill can apply. | ||||||||||||||||||||||||||||||
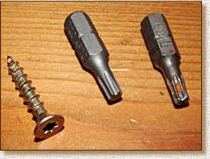 | ||||||||||||||||||||||||||||||
Above: torx-headed wood screw and bits. Below: a bit in a cordless drill. | ||||||||||||||||||||||||||||||
 | ||||||||||||||||||||||||||||||
What’s this got to do with nestboxes? In the sort of wood used here, modern screws do not need pilot holes, clearance holes or countersinks. So assembly is so much faster. Place the panel against the batten and whoojj up the first screw gently. Before it is firm, check the panel is at a right angle and tighten. A few seconds. More panels and a second batten, and the side is completed in ten minutes or so. And with torx, never a slip. Moreover the system will not slip if the drill wobbles or pressure is reduced. Indeed it is simple to put the screw onto the bit and offer it up to the wood. This means that a screw can be fitted and tightened with a cordless drill in just one hand. Many of us who use a ladder do not enjoy the experience. We may know that really we are quite safe, but it just doesn’t feel so, especially when both hands are needed for the work. Now however we can screw (or unscrew) easily and safely as we hang on to ladder or branch with the spare hand. In practice this can be quite handy as from time to time one needs to remove panels for cleaning or other reasons. It saves a lot of time if this can be done with the nestbox in situ, up the tree. No more dodgy hinges, loose catches or rusted clips. A panel(s) that gives access to the interior is simply removed by unscrewing the screws to leave 3-4 mm protruding through the back. This is enough to align the panel when it is refitted onto the internal battens. When replacing a panel, the overlap of the shiplap should be tight enough to hold the panel in place and the T-star head will allow the cordless drill to be used to drive it home while leaving a hand free for the ladder. The positive torx drive of these screws allows them to be removed easily even after a couple of years to allow cleaning or maintenance. Even the floor planks can be removed easily and safely.
Translucent panels for extra light In the design shown two shiplap panels can be removed and replaced with a translucent panel of polycarbonate (see plans below). Thick panels of this material are used for conservatory roofs, and thin (6 mm) panels are a safe form of glazing for greenhouses. The latter can be sawn and screwed easily, so are simple to use. If the interior of the nestbox proves to be too dark for the planned TV nest camera in daytime it will be easy to replace the shiplap with a translucent panel in a minute or so. | ||||||||||||||||||||||||||||||
Tips for attaching the box to a tree Fixing the box is also simplified by technology. Wood screws of the type shown on the right are just as stable on the drill but are far larger. They also are of a modern design that do [not?] need a pilot hole. So these too allow one-handed use of the cordless drill — handy when 5 metres up a ladder. They are available as Timberfix Plus Exterior Timber Screws and come with a hex bit (also shown on the right) for power driving. They are also easy to remove even years later. Of course they are far heftier than even the largest torx-head screws and require a powerful cordless drill. There are a number of other fixing screw systems that will take the weight of even a heavy nestbox. These include stud anchor bolts, which are pushed into a hole that's been drilled in the tree and expanded to become secure by tightening down the nut. There will then be a protruding threaded stud onto which the nestbox can be fitted and held by stainless-steel nuts or wing nuts for ease of subsequent removal. So, before assembling the nestbox, position the back panel only — much lighter and easier to handle than the whole nestbox — and drill through the top and bottom battens into the tree to mark the position for the shield anchors, which can then be fitted and tightened. The panel will then fit over them and can be bolted on using a second nut and a washer. After checking it fits, the back panel is removed and the box assembled ready for the whole box to be winched into position, fitted over the studs, and the nuts spannered tight. | 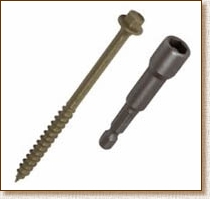 | |||||||||||||||||||||||||||||
 | ||||||||||||||||||||||||||||||
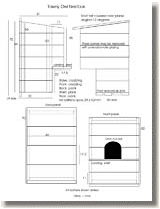 | ||||||||||||||||||||||||||||||
Nestbox plans The dimensions are as per this plan but are in no way critical other than being large enough for the family we hope to attract and to give the space we need to get a good camera view. (Click to view the approx 1000 x 800 px plans. The jpg format page can be downloaded in the usual way.) | ||||||||||||||||||||||||||||||
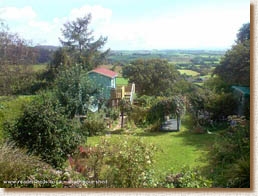
Updates/progress reports Sept/Oct 2009: A local male owl, previously heard only at a distance, has suddenly been paying a lot of attention to the garden. Coincidentally he first started hooting the same day (ok, night) Ali replaced a lower side wooden panel on the nestbox with a polycarbonate window. As of the beginning of October he's been visiting the garden for three weeks and has been heard hooting for up to 3 hours! He doesn't have a partner yet, and so far he hasn't been seen to actually visit the box. My bet is he knows all about it, and we all think he's doing his best to let any local unattached girls know that he's on to something good. Ali's garden, and a very imaginative folie summerhouse that graces it, can be seen here on We Love Sheds. The nestbox and country track are to the right as you look down the garden and across to the sumptuous view of the countryside beyond. It's all so enchanting that I include a clickable thumb of the garden below. | ||||||||||||||||||||||||||||||
 | ||||||||||||||||||||||||||||||
powered by owls | ||||||||||||||||||||||||||||||
Dutch letterbox
with a difference
The box is about 12 ft up in trees between the garden and a quiet country track
