 |  | ||||||||||||||||||||||||||
 | |||||||||||||||||||||||||||
 |  | ||||||||||||||||||||||||||
Adding a video camera
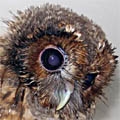
. . . is not difficult and doesn't cost the earth. The best thing is you can see the owls any time without disturbing them. | |||||||||||||||||||||||||||
Feed by mother owl filmed in April 2008 using setup shown on left. (5.5 Mb mp4 movie, 1 min 35 s) | |||||||||||||||||||||||||||
CAMERAS ARE A NEW VENTURE for us and we only have one season's nesting events under our belts. So I'm not claiming too much expertise in this area. As I record on to a camcorder there's no advice here about live webcasting. Our camera-equipped nestbox is out in the woods, so everything has to be battery powered. Anyway, here goes . . . ———————————————————————
What you need A suitable nestbox Infrared camera (with built-in mic) for day and night viewing; colour camera for day only. Infrared light (for IR camera). Cabling: Combined A/V and power (standard from nestbox cam suppliers). Phono plug adapters: You'll need some male-female adapters (i.e. female both ends) to connect up. Power: These camera/light systems run on 12 volts, so either a transformer from the house or a battery supply. Latter can be a car battery (heavy, expensive) or a caddy carrying eight 1.5 volt AA batteries. Appropriately sized crocodile clips to clip to whatever battery/caddy you're using. Camcorder: Must have an A/V (audiovisual) in connection. Many just have A/V out. A/V connector for the camcorder: Your camcorder should come with this if it has an A/V in socket.
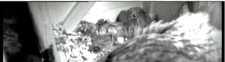
My setup this year Here's my setup in action in spring 2008. Believe it or not I don't have a pic showing the camera in place in the box! As indicated in the pic at the top of the page, it was in the top front corner looking down across the floor, with the light in the back corner. The camera was screwed on to the piece of whitewood (added to take screws and give weight to the small triangular mount I cut from the interior ceiling). The camera and mount were then simply inserted back into the slot, with the camera hanging underneath. The adjustable light holder was angled so the IR light shone down through its own slot and across the owl compartment. A few simple tests were done offsite with the camcorder to make sure that the whole setup was working. This camera and light arrangement has disadvantages, as I'll explain further down. | |||||||||||||||||||||||||||
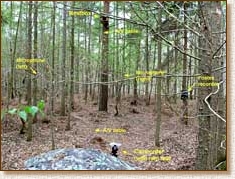
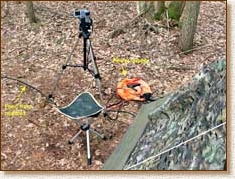
General setup View over tent showing the nestbox with about 70 ft of cable linking the nestbox camera to the camcorder. Ignore the labelling on the pic about microphones and recorder—this was a separate system I used to make continuous external recordings of owl activities. All that's relevant is the nestbox about 20 ft up the tree, the cable running down the trunk and over the ground, and the camcorder just visible over the top of the tent. I tied the cable to the tree in about three places—you don't want the weight pulling on connections in the box. There wasn't any need to bury the cable across the ground as it's a secluded location and the installation was temporary. | |||||||||||||||||||||||||||
 | |||||||||||||||||||||||||||
 | |||||||||||||||||||||||||||
Details The camcorder taking video feed from the nestbox camera. Normally at night I'd be concealed inside the tent, but towards the end of nesting the owls appeared to be happy with me sitting outside for a couple of hours during the day. This pair knows us well. Tawnies are quite variable in their reaction to a human presence—some will tolerate it, others won't. If you're this close when monitoring/recording the adult owls may be disconcerted by the sound playback from the camcorder. To stop this attach a headphone and listen through that. | |||||||||||||||||||||||||||
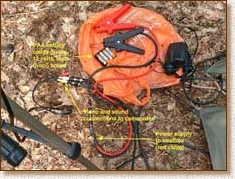
Connections and power for the nestbox camera and light. I found that a caddy with eight rechargeable AA batteries was sufficient to run through the night. The limitation was the seven or so hours the big camcorder battery lasted for. It looks a bit daunting, but in fact it's very simple. The croc clips were intended for a car battery, but I used a small caddy (from Maplin). I had to solder connections on to the ends of the very thin leads from the caddy to give something for the croc clips to grip. (Part of the pic is mislabeled . . "Power supply to nestbox (red cable)" should of course read "(red and black cable)", which are + and - leads). | |||||||||||||||||||||||||||
 | |||||||||||||||||||||||||||
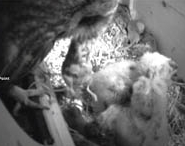
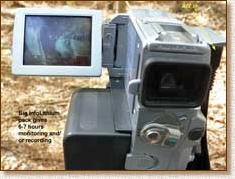
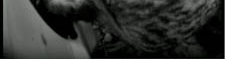
The camcorder in operation showing a view of the chicks. The A/V connector is just visible plugged into the right side—luckily my model has an A/V in socket or I wouldn't have been able to use it like this. To record with my model I have to go into view or playback (not record) mode and then go through a couple of menus to find the record control for when it's hitched to a remote camera. What's convenient is that in this mode it'll stay on standby indefinitely without switching itself off, so you can monitor without interruption even when not recording. Your IR nestbox camera should adjust to varying light conditions, e.g. as the owls move around. Here it's working by daylight. | |||||||||||||||||||||||||||
 | |||||||||||||||||||||||||||
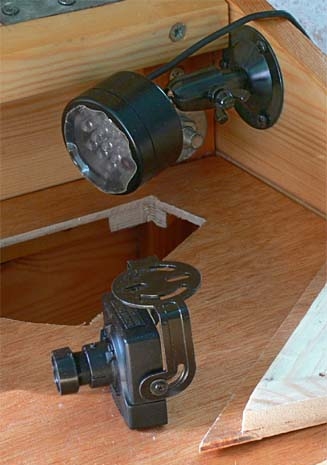
Positions of camera and light shown on a pic of the nestbox during construction. This arrangement turned out to have quite major drawbacks. For example when the owls turned away from the camera all one saw was their backs; I had the camera pointed a little too low, so heads were sometimes out of view; and an owl standing up in front of either camera or light sometimes obscured everything else! I still prefer a side-view arrangement to a top-down view, but you do have to think (and test) carefully before committing to any particular setup. As a result of this season's experience I'm thinking that the ideal minimum is two cameras—one each side, as one can't predict which way the owls will face—and more lighting. | |||||||||||||||||||||||||||
 | |||||||||||||||||||||||||||
More on how it's done All that was left out when I wasn't there was the nestbox camera and cable. The leads at my end of the cable were stowed under the porch of the tent to protect them from rain. The tent is my rather useful (and very necessary) hide. So, whether I was doing night or day monitoring I'd go out with everything else: camcorder, tripod and A/V connector, recharged battery pack for the nestbox camera and light, and the power lead (the thing with the big croc clips). Setting up was then a very quick, simple business and I'd be watching the mother and/or chicks within a minute. I didn't film continuously—the results would have been repetitive and boring! I found instead that most night's events could be recorded onto, very roughly, an hour's cassette. The rest of the time, until the camcorder battery ran out, I spent monitoring . . i.e. watching. This does mean however that you have to become familiar with the parent owls' habits if you want to catch interesting events like prey being brought in. Very occasionally I'd unhitch the camera and use its supernightshot setting to film events outside the nestbox. In this case I filmed continuously to make sure of catching the male arriving, downloaded the actual arrival onto my computer and then reused the cassette. You could keep a couple of "scrap" tapes to do that sort of thing. Obviously if you can afford two camcorders you can film inside and outside at the same time. For outside I'd recommend using a camcorder with a hotshoe and attach an infrared light as I found the supernightshot setting only just adequate at 35 ft (fps rate was very low and not enough to show the owl flying in and out; autofocusing was also very slow). For night-time monitoring I always stayed inside the tent as this particular pair would not approach the box if I was visible. They knew very well when I was around, but as long as I was out of sight they were perfectly happy! Other pairs may be different, especially if they live near a house, and may not mind you sitting out. On the other hand cover is essential when it rains! A complete change of gear is required when the chicks fledge as now you're moving around outside to film. The upside is that recent fledglings are very unshy and tend to stay put. At this stage (and in the 10 days before fledging) you may be lucky enough to get some outside daytime shots of the mother too as she hangs around guarding her prized little ones. Always use a tripod for good, steady shots. Don't underestimate the time and dedication all this takes. And when it's all in the can, making movies out of your footage will probably take the rest of the summer. Finally, you can, if you're lucky enough to have owls nesting near the house, record directly on to your computer. I have no experience of this so offer no advice, but it must be dead simple. Your equipment supplier will tell you how. Currently there is no possibility of transmitting decent quality video by radio over any distance. Shame, as some nights I'd love to stay in a warm bed.
Camera setups Top- or side-mounted camera? A top-mounted camera is the standard setup often seen in tall, narrow boxes. I'm not in favour of it because of the limited view it gives—mainly of the mother owl's back! I want to see my owls' faces, hatching, food preparation by the mother, feeding, and a host of other things that can only be seen if the camera's on a level with the owls. Also, top-down cameras tend to give a rather distant view of what's going on as with their wide field of view much of the image is wasted on the sides of the box. For all that a supplementary top camera has its uses in giving an extra perspective, as in the OwlCam box (link below). Side-mounted cameras give a more interesting view, but such setups have complications as (1) you need to set the camera back to put some distance between it and the owls; (2) a single camera will miss out on what's happening if the owl(s) turns its back on the camera; and (3) lighting has to be considered more carefully. These tiny cameras have huge depth of field—that is they can simultaneously focus anything from a few inches away to infinity. In practice I found that mine could just about cope with the mother's head being as little as three inches away. (Nb these cameras adjust to different lighting conditions but there's no autofocus. They have one focus setting. This should be adjustable using a tiny screw on the lens barrel, and it's worth checking that the focus is optimally adjusted at the outset as nothing can be done about it once nesting has started.)
Mounting a side camera in a recess The way to put distance between camera and owls is to mount it in a recessed enclosure—i.e. a small box attached to the side of the nestbox. This also protects it from inquisitive attentions by the mother, or just being knocked out of alignment. Such arrangements have been used to good effect by OwlCam (see first two clips on this OwlCam DVD purchase page) and by Chris Johnson for his Eastern Screech Owl cam (follow links on the home page for details). This effectively means adding an unsightly box to the side(s) of your nestbox, but I'll almost certainly be doing this for next year. It'll also mean I can put the cameras lower down. A necessary evil—and quite a bit of extra work—if one is to get the best results.
Which side to mount a single side camera Suppose you're limited by your budget to just one camera, which side should you put it? This is a difficult choice, and one that's really determined by which way the mother owl usually lies when brooding. With our low-profile box the mother usually lies the way she can best hear her mate. If you know which way she prefers to lie the choice is obvious. If you don't you'll just have to take pot luck, or go for a top-down mounting. After she leaves the box for good, which happens when the older chicks are 10-12 days old, any position will give a good view.
How many cameras? Having spent hours over two months watching owls on my 2008 setup—and feeling so frustrated things happened partly out of view—I confess I'm toying with the idea of three cameras!! My ideal would be two side-mounted cameras and one towards the top of the back aimed at the door. The function of the third camera would be to catch the dad when he delivers as he never comes into the box. All one sees with a side camera is his nose and whiskers! The downside: this of course would need a minimum of two camcorders as the one trained on the door would have to be kept running. This dad doesn't announce his visits with a hoot as he approaches—he just turns up. And, oh dear, how I'd like a colour camera for the daytime . . .
Possible problems Audio or visual interference: Initially I had a problem with a buzzing sound in the audio. I don't know what caused it, and after a few sessions it went away. Obviously always check all connections are good: if the A/V connection to the recording equipment comes loose it causes disturbance on the image. Make sure connections in the nestbox are sound before nesting starts as it can be dangerous to attempt adjustments up at the box when the owls are using it. Noisy reverberation in the box: This was my biggest problem. The camera mic was very sensitive to low-frequency noise from air and road traffic, which seemed to be amplified within the box. At the moment I have no idea how to solve this one, and simply resort to reducing the noise in my movie program. Separate mics might be one solution, but whatever, it's advisable to check how things sound with the box out there where it's going to be. Miisaligned CCD in camera: It took some time to spot this, but it became evident that the image sensor in my nestbox camera was not properly aligned with the focal plane of the lens. This meant that the right side of the image was in focus, but the rest of the picture across the middle and towards the left was progressively fuzzier. Worth checking at the testing stage. Obviously a faulty camera should be returned and exchanged for another. Vandals: Cables running down from a box make some folks very curious, so if there's any risk it's best to remove the cable and recover the camera (or even the whole nestbox) as soon as the chicks have fledged and left the area. We had exactly this problem and were forced to move the nestbox from its original location to another better concealed site. One cable was wrecked.
And on your computer I won't say much about this, but the basic needs are a movie program to record the video (directly or from a camcorder) and make movies, and, unless you have a huge hard disk with lots of free space, a fast external drive. If you want to put clips up on YouTube you may find separate mp4-making software useful as it may give you more flexibility than a movie program—I use MPEG Streamclip, which is available for both Windows and Macs.
What's the cost? For the nestbox shown above: One IR camera with light and 20 m cable plus all connectors and a mains adapter (12-V transformer) cost £140. For a second nestbox we kitted out: IR camera, colour camera, ca 25 m cable for each plus all connectors cost £350. Prices given are when bought in 2006 from Boxwatch. Doesn't include car or other batteries. A mains adapter is useful for testing your setups back at the house.
Other considerations Maximum recommended cable length is 100 m. One expert I've spoken to says you can reckon on 5% degradation for every 10 m of cable. I saw no discernible problems with 25 m. For best results use minimum compression settings on your camcorder. Even medium levels of compression introduce "smudgy" artefacts into the picture. Fairly high compression settings are often found on hard-disk camcorders, and should be avoided. My camcorder—an old Sony Handycam model DCR-PC8—records to DV tape with minimum or no compression (on its "HQ" setting, which I used, I'm not sure if any is applied). You'll need huge hard disk capacity if you're to do much with the results—like making edited movies that won't bore people silly. One hour of high-quality DV video takes up 13 Gb. My total for 2008 was 20 hours, or 260 Gb. A 500 Gb disk gives reasonable space to store all that and make a few movies. On the other hand the cassette tapes the original material was recorded on are relatively cheap and reliable storage and backup. If you find the compression artefacts acceptable (I don't), you may be interested in camcorders that record in mp4 (mpeg-4) format to their own hard disk. One Sony model I tried (but returned) did 14 hours on its 40 Gb disk on its standard setting and something like 9 hours on high-quality setting. Results with the high-quality setting were just about acceptable. On standard quality the file size for an hour's recording was 3 Gb and the mp4 file could be dragged across to a computer hard disk. This is really convenient compared to what I have to do with my Sony Handycam—record everything in real time into a movie program. But it still leaves me wondering why they bother with a nice Zeiss Tessar lens when the results can be so heartbreakingly awful you might as well be using a cheap plastic lens!! | |||||||||||||||||||||||||||
Amaze your friends . . . . . when your matchless movies are watched by millions on YouTube. Well, I'm happy enough if one or two a day have a look! The advantage of YouTube is you (your server) don't have to host the video and viewers can blow it up to full screen. And it's really nice if someone likes it enough to award it a few stars. Click on the YouTube logo for a movie of Mr Owl delivering a catch made with a combination of inside and outside shots. As I only have one camcorder the visits shown actually happened about 3 hours apart. The movie runs for 1 min 10 s. (Seems I'll have to make a better version — this one looks a bit blurry) | |||||||||||||||||||||||||||
 | |||||||||||||||||||||||||||
 | |||||||||||||||||||||||||||
See more of our nestbox videos starting on page 5 of the Tawny Owl Nesting Diary 2008. | |||||||||||||||||||||||||||
powered by owls | |||||||||||||||||||||||||||
Nestboxes
for
Tawny
Owls
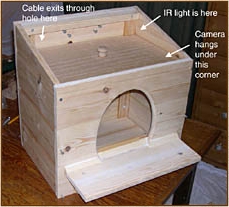
Our main nestbox was built with an attic just in case ... and a couple of years later here's the equipment going in—camera in front, IR light at back. Clicking on the pic brings up a wider version showing the triangular slice of ceiling panel under which the camera is slung.
Now add a camera!